|
Brick backsplash adds so much warmth and texture to your space. One of the greatest things is that since it's backSPLASH, it's only adding a splash of that gorgeous element, and does not visually overwhelm your space! Unfortulantely, real brick can easily overwhelm your budget!!! Well, it can overwhelm our budget anyway! In a 97 year old home with a reno list as long as the weekly grocery list, you get creative in how to cut cost corners and dust off the DIY skills! To be completely honest, we would have passed on having any backsplash at all, and would have just enjoyed another foot or so of this dreamy shiplap, but the backsplash area of the shiplap had been badly damaged. The previous owners had used a laminate tile glued to the wall and had put the glass stick on tiles stuck over that. Removing it all was fairly simple, but that glue had really done a number to the wood. We had originally planned on living with the damaged shiplap while we worked our way through other projects. After we got through more pressing matters, we could come back to the kitchen to install a subway tile. It wasn't until last week, when I white washed/german smeared the adjacent fireplash in our dining room, that I decided to go all in on brick backsplash. I just fell head over hills and needed to see it all over the place! :) I remembered seeing panels of brick sheets at the hardware store, and since our outdoor chore got an unexpected rain delay (these leaves are just bound and determined to stay in our yard) we impulsively decided to tackle backsplash! We measured the backsplash area, drove to the store, loaded up the panel (our measurements indicated that we only needed one), and came home to get started!!!! You can see how the sheets looked before I painted them in two of the pictures from the gallery above. I normally have large photos that reference what I am talking about right below what I am talking about, but I am having some serious techical glitches with inerting images today! I hope to get it straightened out and come in to correct that very soon! We originally thought we could use snips to cut through the panel, but these jokers are for real!!! They're not thin, flimsy sheets of paneling. They were just too thick to comfortably snip our way along. I mean, it's doable, but there would be some serious hand cramps along the way, and quite a bit of time added to project completion. The "brick" has loads of textures and varries from brick to brick. Those differences are really what convices the eye of the brick's authenticity. You feel lots of texture on the "brick" as well. The main diference in feel is the temperature. Authentic brick is cold to the touch, but this is room temperature. We decided to use a very dainty looking saw blade on the jig saw. Because it was raining (and freezing) outside, and this was a project we were doing (per usual) with the kiddos about, we worked inside. Ya'll, this creates an enormous amount of dust. I mean, one panel of the cuts we made filled the dust pan probably 12 times. Maybe even more! Some dust does go up into the air, but the vast majority falls right to the floor. Doing these cuts inside are kind of like using the snips instead of a saw.... It can be done, but not advisable! ha! The center section of these panels are some sort of wood....cardboard? mdf? I don't even know, but it is finely pressed, and the quality is FAB! After you have measured section to section to make your cuts, remember to start your next cut where needed to allow for the grout lines to match up when they're on the wall. You can see what I'm talking about with the picture below. (some imgaes randomly worked and most said they uploaded but never became viewable. I'm so sorry for the inconvenience! Side note: Can you can see all that great texture in the "brick" ??!!! See how it varies from brick to brick! I love that they weren't carbon copies of one another! Totally saved me time when it came to paint them! 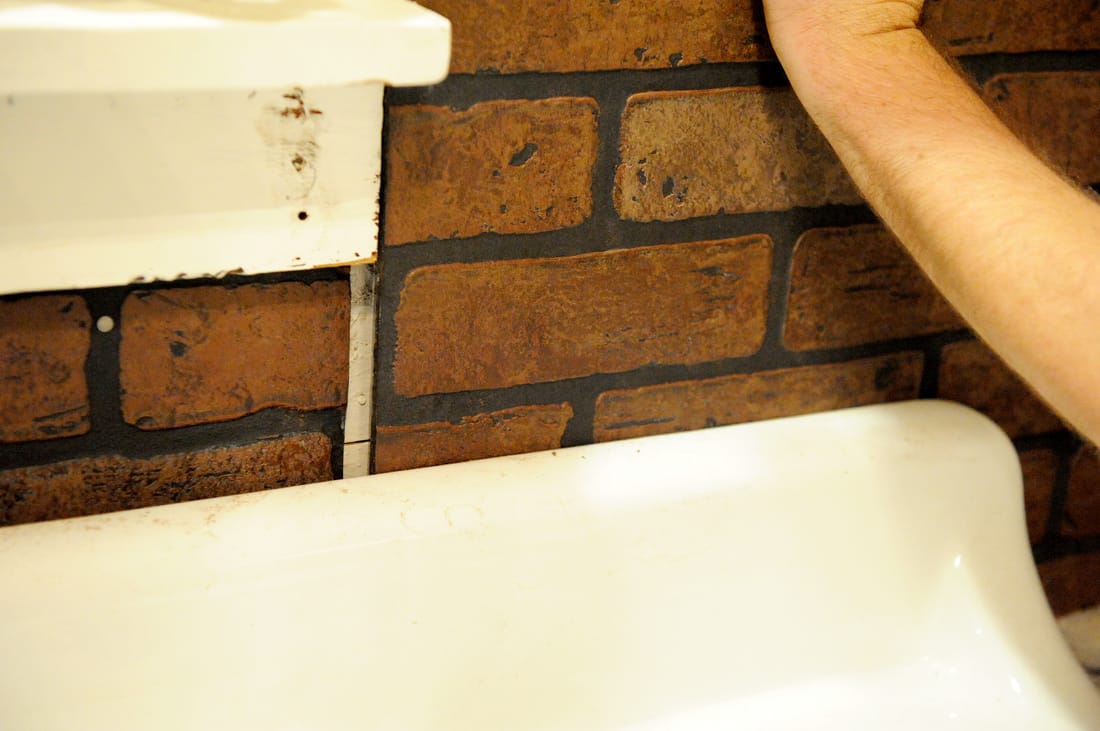 We would hold our sections up to make sure they were going to work, the lay them back down so we could find our measurements for the outlets and light switches. We just measured this with the tape measurer each time, then took those measurements to the brick section, marked it, and cut out the small rectangle. To start the cut, we would use the drill first, which would make a hole just big enough for the saw blade to fit through. The we could easily navigate the saw through and around to cut out the rectangle. Just be sure to make your rectangle smaller than your plate cover so the brick will hide nicely behind the cover. I will say, you will probably need the outlet box extenders. (I believe the technical term is an outlet spacer. They fit around the outlet bolts on the top and bottom, and are really common when adding any backsplash). We didn't need to use them because they were already in place (due to shiplap). I can't offer any suggestions on how to install them, but please be carful to avoid a shock! Okie dokie!!! Install time!!! We thought about using liquid nails, but realized two things: 1- We already had a ton of glue damage to the wall. We knew that we would have a very difficult challenge getting anything stick to that! 2-If we ever changed our minds and wanted something different, a strong adhesive would make removal so complicated. We opted for finishing nails!! The worked like a charm. We just made sure to place them in "grout" lines since they'd have the most heavily applied paint fauxing! Once we worked our way down the one wall, and sighed about having another wall to do, we gave each other a pep talk, thanked the good Lord above for how well the first wall came out, and jumped back in there for wall number two! The second wall had much less cuts to be made, and went by so much faster! (The second wall is also the only wall currently cooperating with whatever is going on with this image loading glitch!! Instillation took only three and half hours! Not too shabby, right! So, if you're keeping a tally, so far we're out three and half hours and $25.00! The next step was to paint the brick!! I made my own chalkie paint for this, but you can use any chalk paint. I know a lot of people use the actual concrete mix that is used on real brick. It looks amazing, but has to be sealed, is very chalky, and seemed to me like it would make cleaning a chore....not a good combination for a food prepping and cooking area. It could be totally fine, and, if you know a nice way to seal it, I'd totally say to go for it, but I really wanted to use paint! It's what I am comfortable with, and I didn't want to make any rookie mistakes that could ruin all our hard work! I started with the "grout" lines. I applied this heavily and unevenly. Being thicker in some areas, a little smother in some areas, and messily applied helped create a real grout look! (This is seriously so easy) Not being perfect IS what makes this end up looking perfect in the end!!! Isn't that so nice?! Like, when does that ever happen anywhere else?! lol! After the grout lines were finished, I would barely, barely touch the tips of the bristles into the can of paint. With a lighthand, I would brush from the outer edges of the bricks to the middle. Doing it this was would create a feathering effect with heaviest application towards the outer edges and almost nothing toward the center. This went fast. Just back and forth in sections. Any areas that were too heavy or looked like streaky brush marks would wipe and blend right away with a damp washcloth. I made this layer very thin, and then did it again. The first layer gets it up there, lets you step back to breathe it all in, and lets you decide where you want heavier sections. Going back the second time, I would more heavily fill in some areas. Just randomly choosing bricks that felt like they should be heavier. I made thicker areas on certain grout lines and had it sort of spill off the edge down some bricks. I thought about going back a third time to make it even heavier, but decided I would sleep on it and then decide! I'm glad I did because I decided stopping there would be a good idea after all! This took 30 minutes total!!!! So, 3 1/2 hours to install, 30 minutes to paint, and $25! I mean, you can't beat that! They do have a beadboard option that your could use instead of brick, AND I think you could paint the entire brick, seal with a high gloss seal, and have faux subway tile pretty easily toooooo!!!! If you give this a shot, please share pictures with me! I would love to see how yours turns out! Thanks for stopping by, best of luck on your project, and happy DIYing! 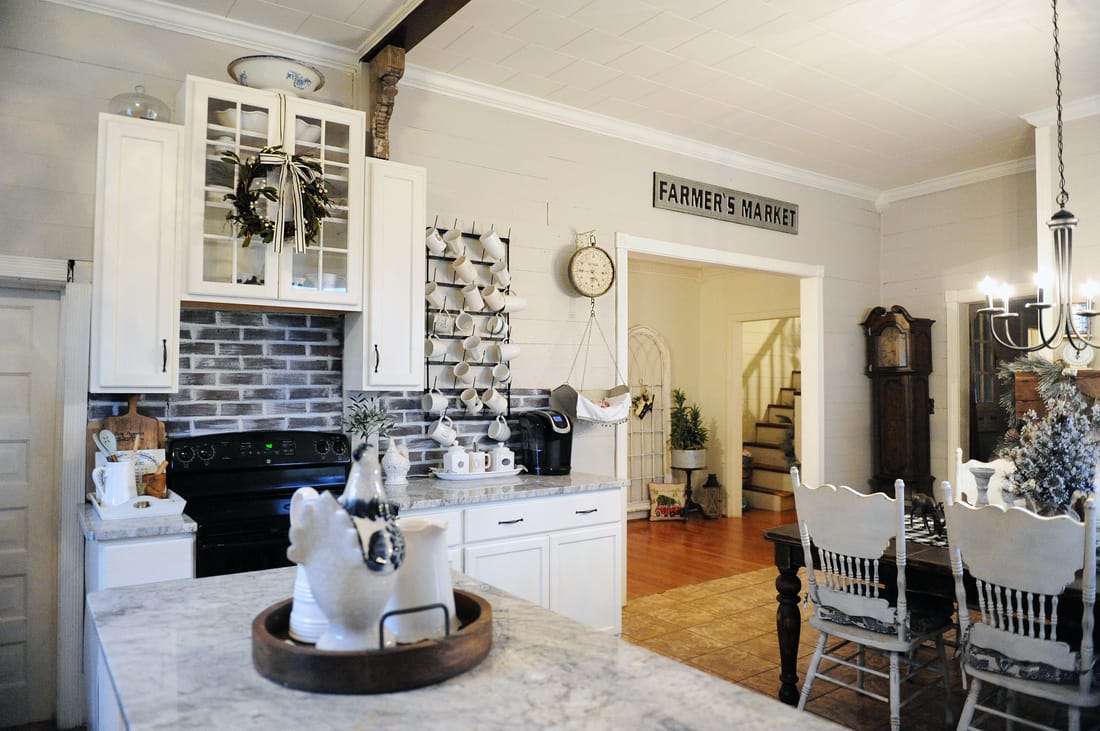 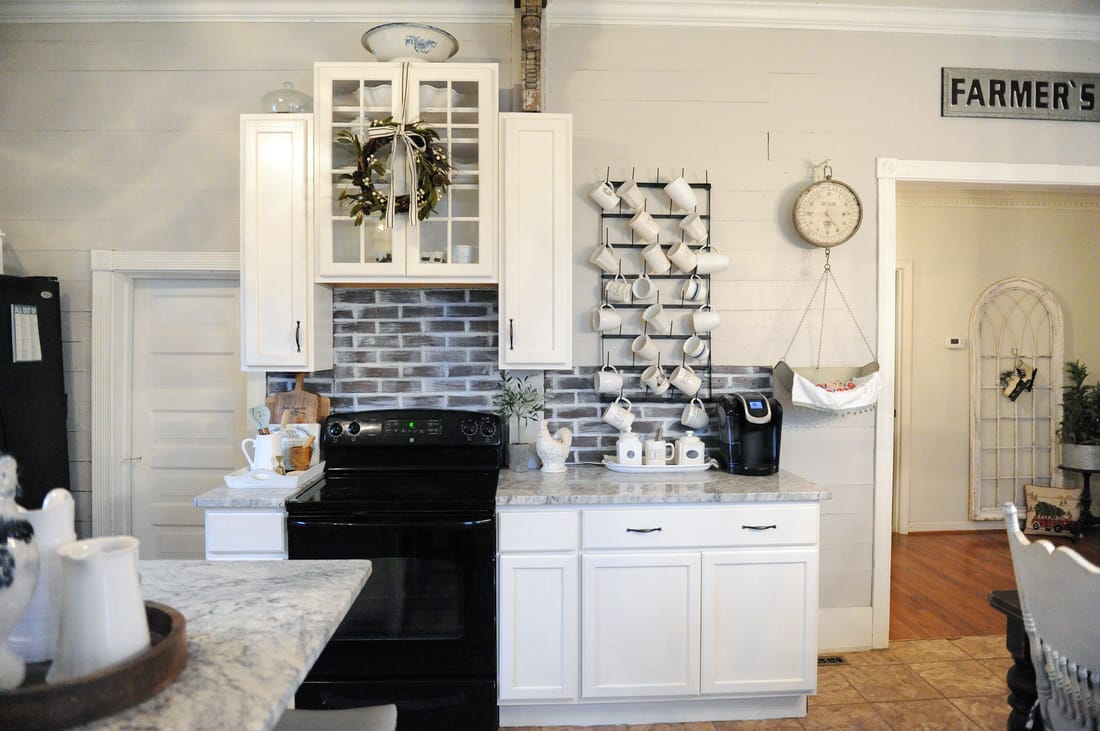  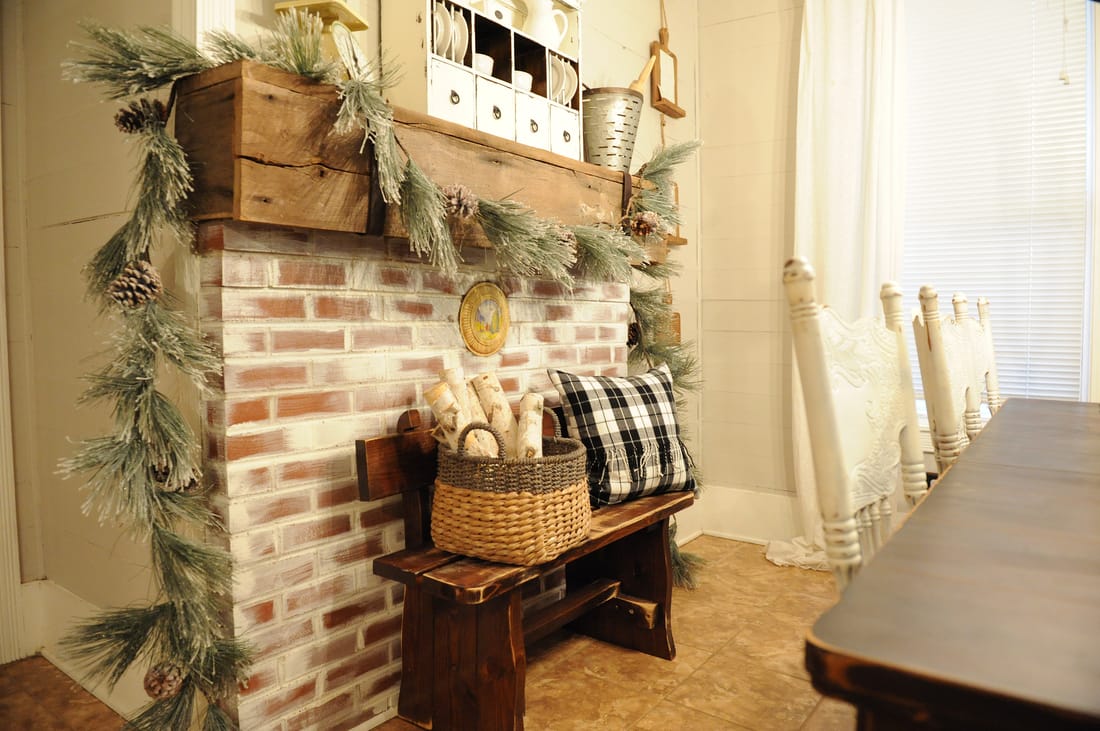
1 Comment
How We Keep Our Tufted Couches Clean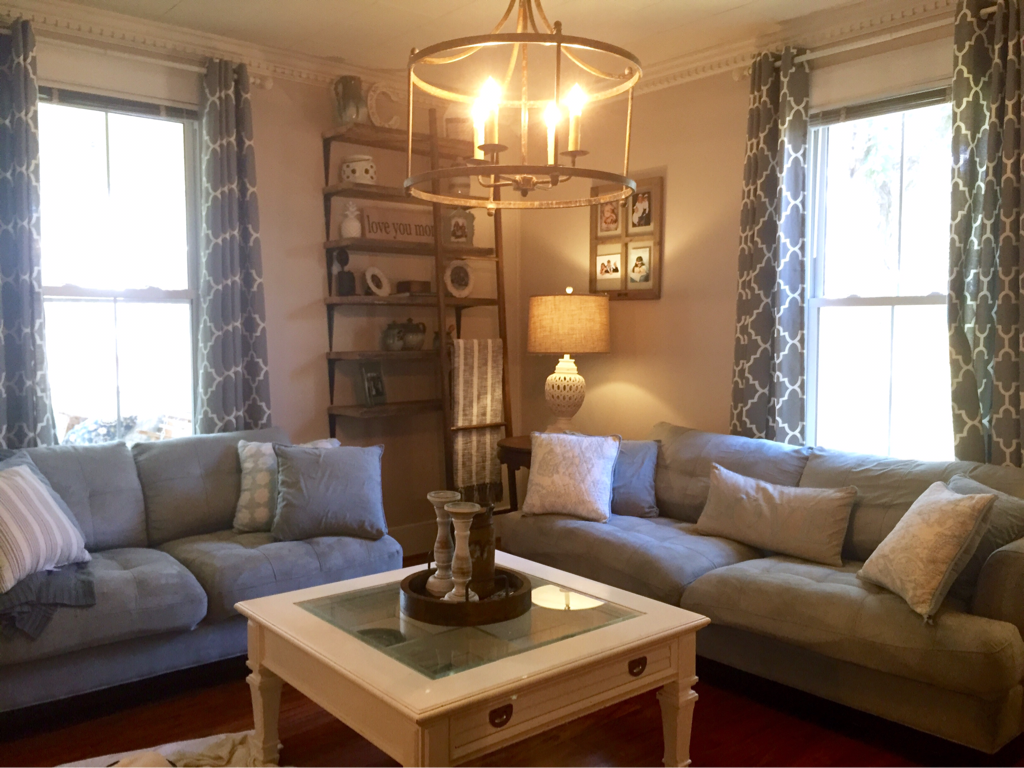 If you're anything like me, you find it hard to keep your keep your couches looking and smelling fresh! We have 2 kids and 3 dogs, and they positively do not care what's on their hands (or paws) before they snuggle up. I try to walk this fine line where everything looks pretty, but is also usable! Nothing is off limits or just for looks! That means, lots of maitenence along the way, but I've found some pretty simple ways to make it more manageable! Our couches are 7 years old! They're tufted, microfiber couches. They do have the scotch guard on them, which I have to say has proven to be worth every extra penny. I don't know how difficult it would be to clean them if they didn't have that treatment on them! After about two weeks, our couches start to look like this- 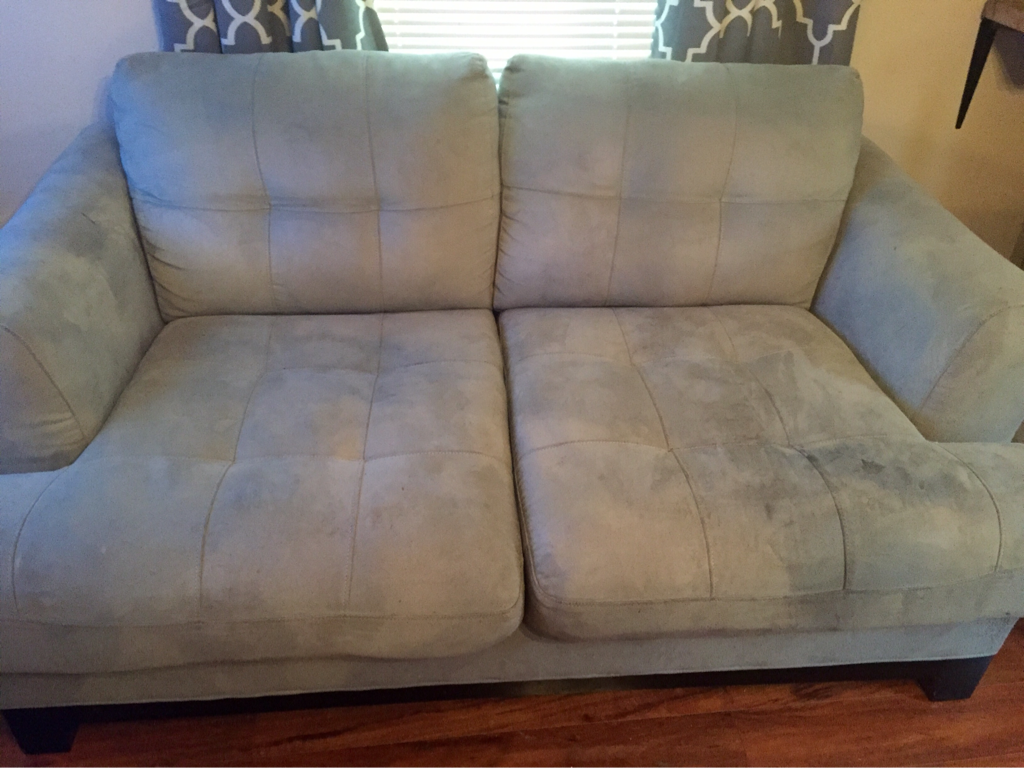 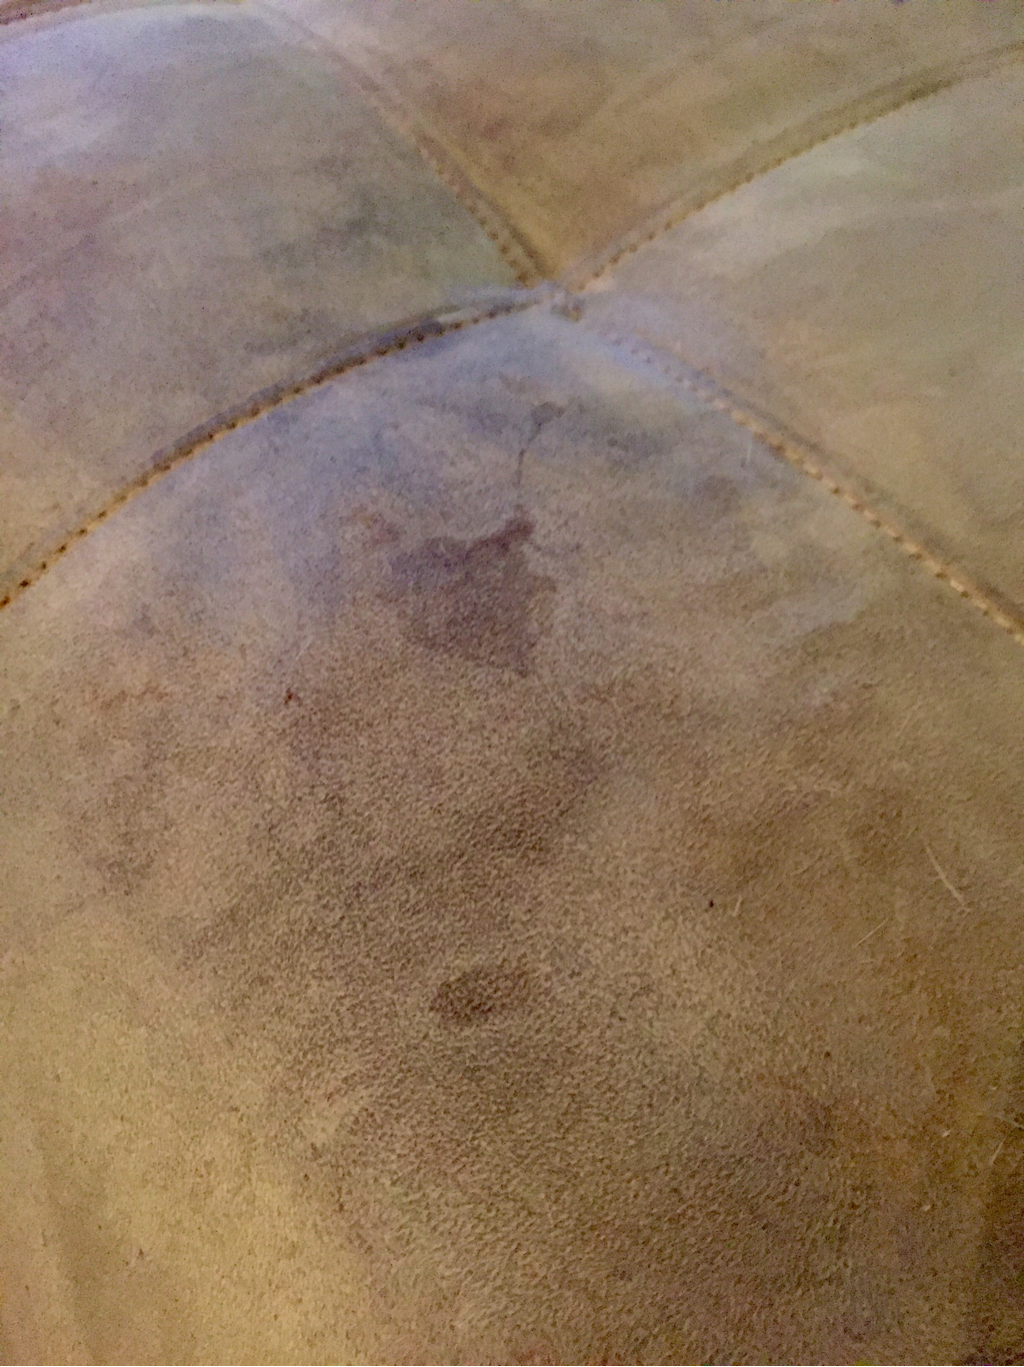 I have tried just keeping the couches completely covered up with blankets, but that turns into an even bigger headache than just cleaning them! It doesn't seem to take more than a few milliseconds for the blankets to get pulled off, or pulled half on half off, they constantly get tripped over, and, honestly, it just looks so ugly to me! I do pull the blankets out and cover them up on rainy days because I have yet to be able to wipe our dog's paws well enough to keep them from leaving little muddy marks on the couches! if our couches weren't tufted, I could just unzip the fabric and toss them in the wash-easy peasy! We've only done that once and decided once was enough!! It was time to work smarter, not harder! To keep these fresh, I just take a small Tupperware and fill it with warm soapy water, and then use a dish scrubber brush in circular motions over the entire couch. I learned quickly not to clean only the dirty spots, or the rest of the couch will end up looking dirty next to the clean spots! 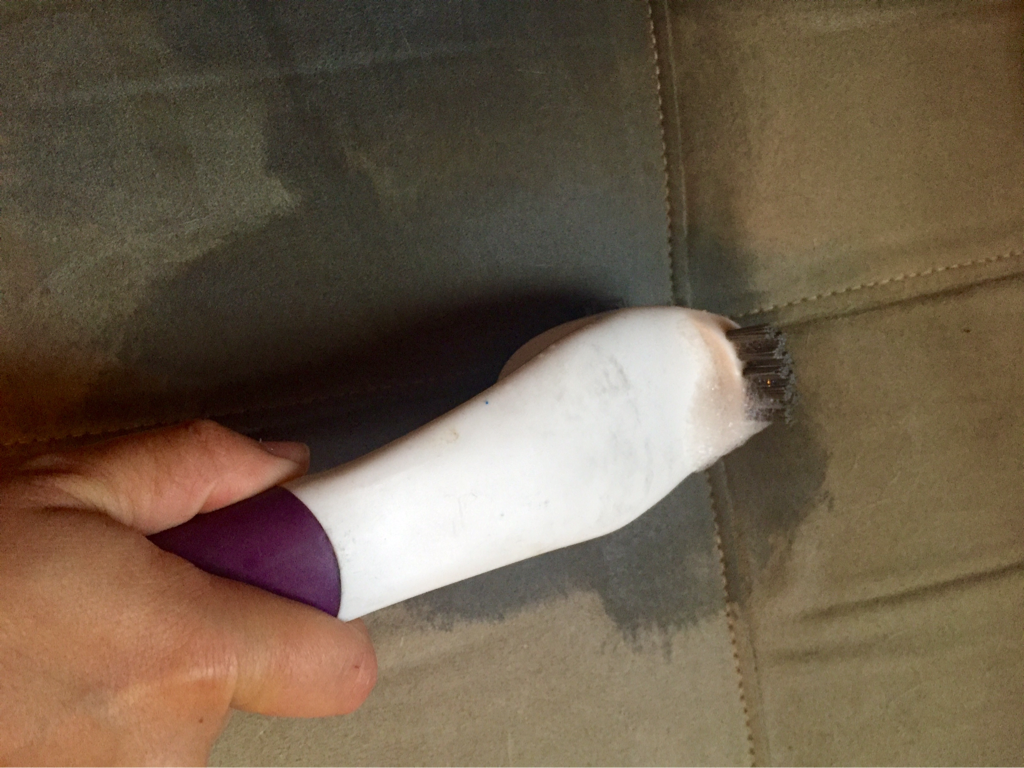 It helps to have a helper for re dipping your scrubber! (Though this will greatly, greatllllllllllllly add to your completion time)! ;) 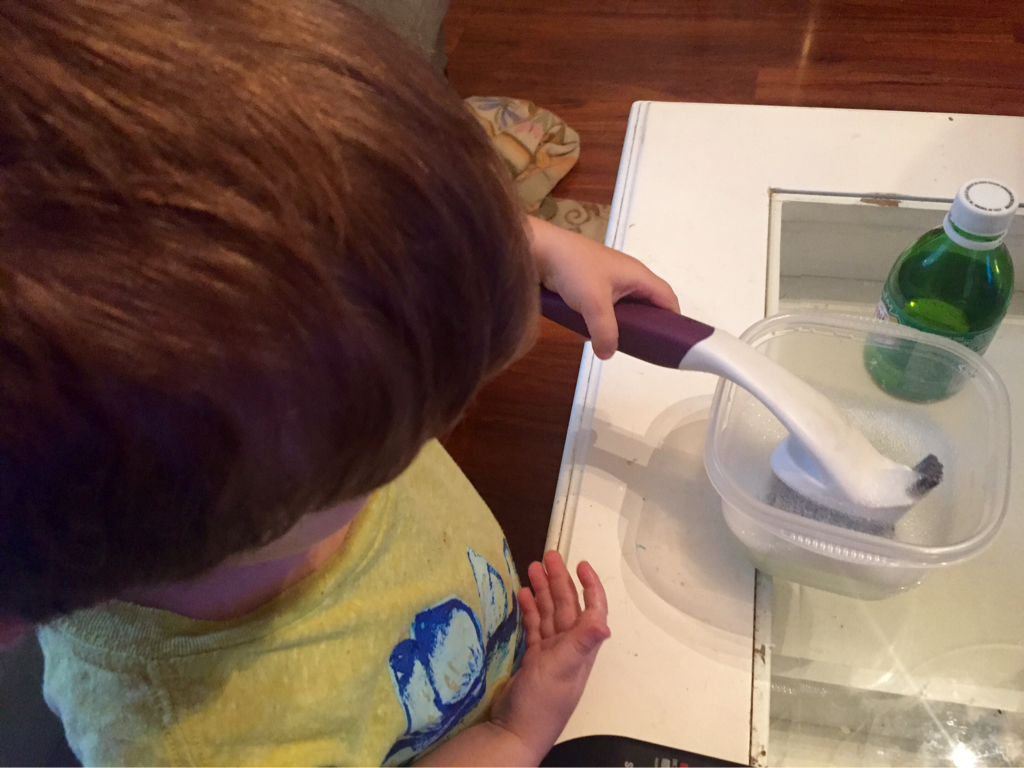 I unzip all the throw pillow cushions and toss them in the washing machine. (I'm sure to wash them on cold so they don't shrink a bit and cause problems going back on the pillow)! I do wash and dry them inside out, and have not had any of my fabrics get ruined. Check your washing tags to be on the safe side! It only takes me about 15 minutes to hand wash the couch! Not too bad! If I had to do it over again, I would NOT have bought a tufted couch! It is such a challenge to take the fabric off the cushions and then re tuft them! I would love to just be able to toss them in the wash like the pillow cases, but 15 min twice a month isn't so bad! What is your preference for couches when you have kids and dogs? Leather, microfiber, or slip covers??! Inquiring minds would love to know!! ;) Here are some pictures of these all nice and clean! 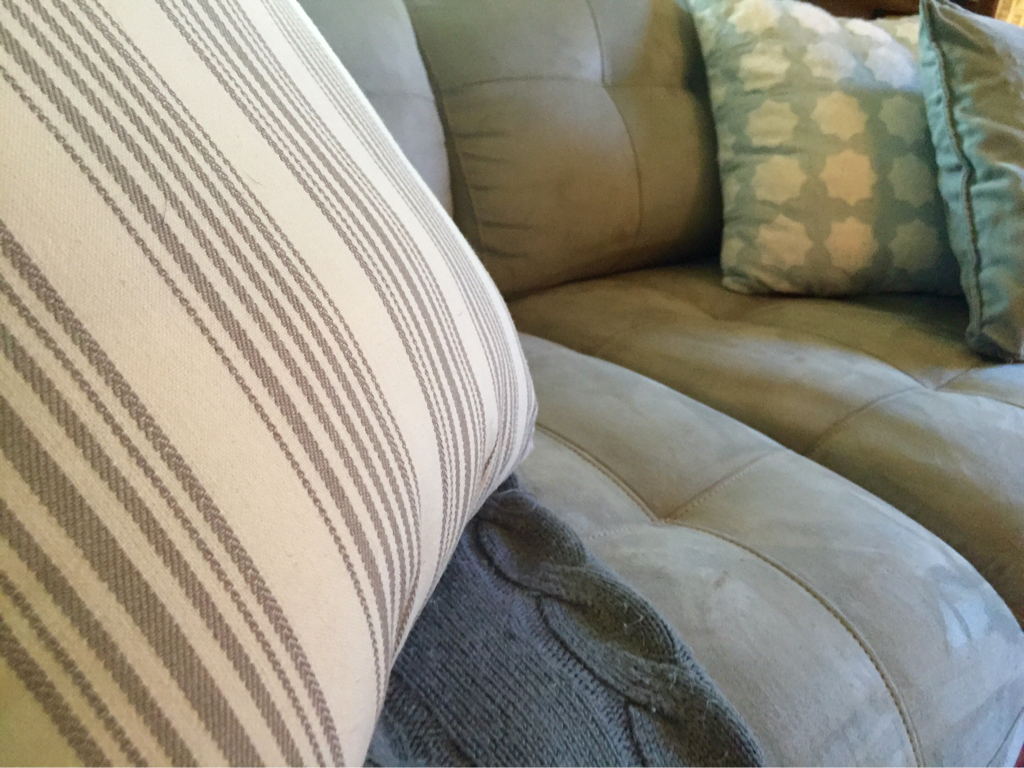 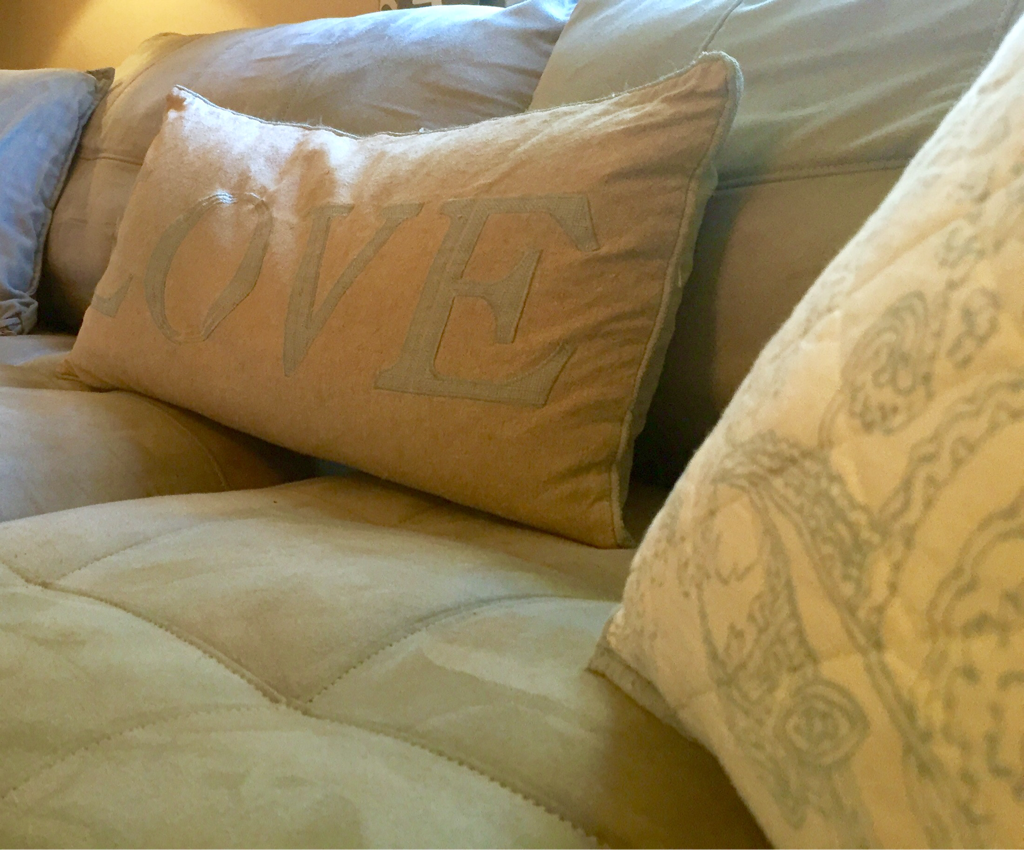   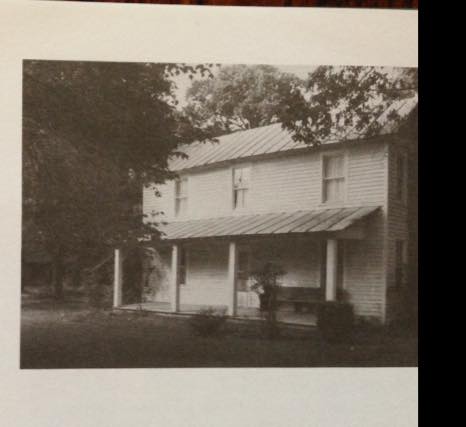 Howdy, folks! I've taken a quick hiatus from the blog because we decided to move! My husband received a job offer from a business that has been in my family since the 70's, and it was too good an opportunity to pass up. It took some serious hustle to make everything line up well, but we managed to put our house on the market, sell it, buy a new house, pack and move, and get settled in to the new house between the track out of school in one city and the first day of the next grade level at the new school in our new city! God is in the details! We bought a house that I am still completely beside myself over. We all have different tastes about what quantifies a dream house. To me, a white house with black shutters, character, creaky floors, wood working, exposed brick, shiplap, bead board, claw foot tubs, wrap around porches, tin roofs, and large, country yards make up a dream house! I can't remember a time in my life, even as a kid, when I wouldn't "rubber neck" every house like this that we'd drive past. I've always thought, "one day... maybe one day"! Well, Psalm 37.4 tells us, "Take delight in the Lord, and He will give you the desires of your heart". We found and bought the dream of all dream houses, in my opinion! This house just speaks to me. Several of our family members came to see this house with us, and we got very mixed reviews. Some could see our vision, and some could see all the work that it would take to make the inside meet our vision! It would undoubtedly be a lot of work to make this house, built in 1919 match what had planned for it, but we didn't shy away. We're ready, and I'm delighted to share this journey with you! Stay tuned for all the DIY projects and before and after posts! Here is a picture of what this house looked like when it was built back in 1919. This home was built using the lumber from the land, and then gave shelter to a family that raised seven children here. As time has passed, so did the parents of the children that were raised here, but now several of those children (and one of the grandchildren) are our closest neighbors. When the home was sold, another couple purchased it and raised several children of their own. They lived here for over 20 years, built on several room additions, and a wrap around porch with gazebo. They have now sold it us to raise our children in, and have moved on the next chapter in their journey. No one has ever passed in this home, but several children were born here, literally right here in the room where I am typing this blog post! This home has been the backdrop for so many memories, and we are so blessed to get to create our story here now! There are two barns and a shed outside, three adjoining chicken coops, a pig pen, and a dog pen (our dogs are so spoiled, but maybe we turn it into a duck house/duck pen soon)! One of the barns needs a lot of work, but will be perfect for refinishing furniture in soon! 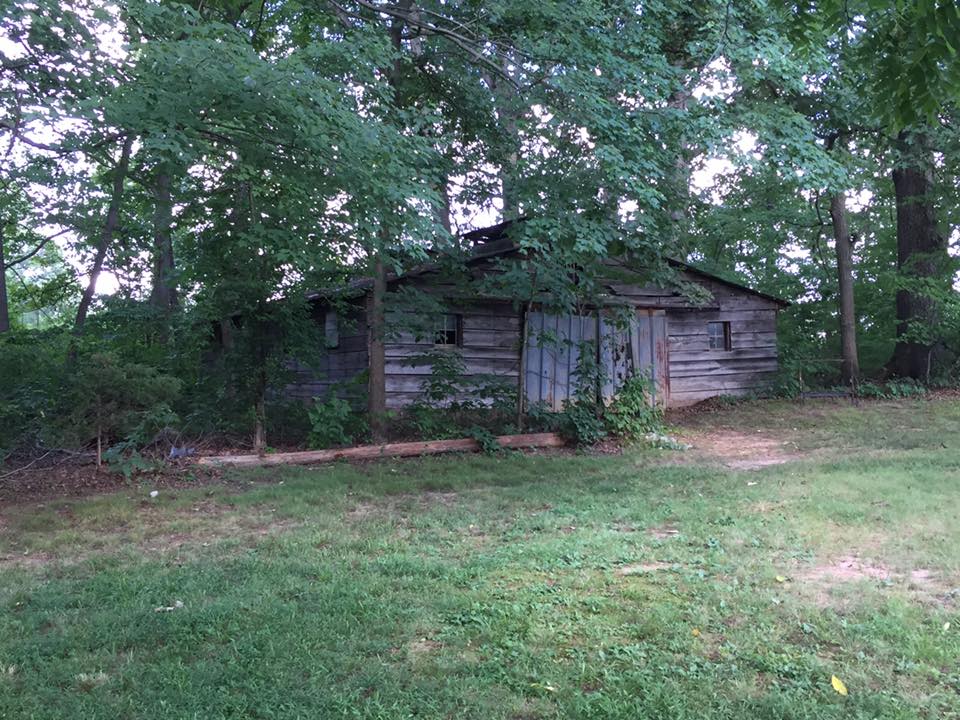 Be sure to check back to see the story of this farmhouse unfold!
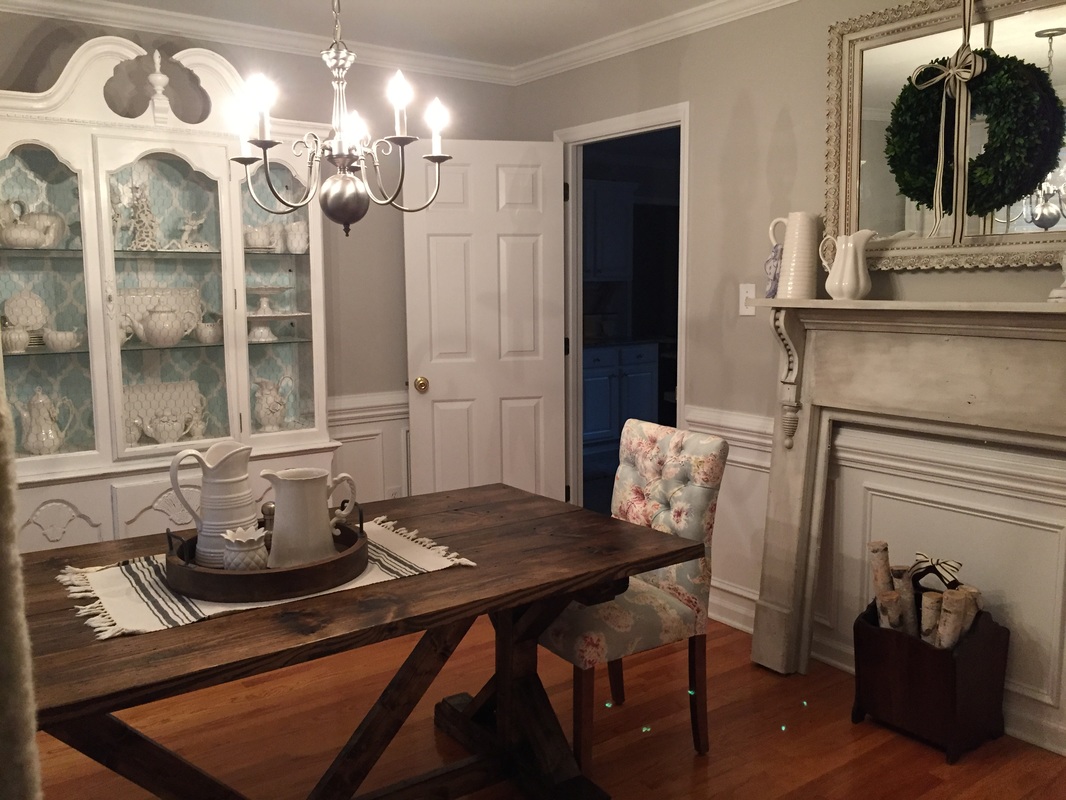
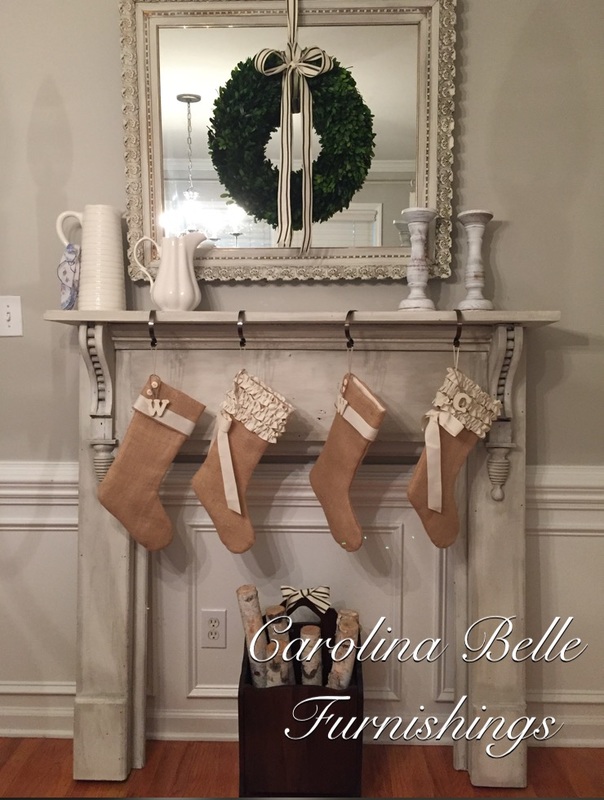 Ahhhhh, Is there anything more charming than a fireplace mantle? Well, maybe an antique fireplace mantle tops the charts! We've added one to our dining room, and it has really added so much warmth and character to the room! We have three available at Carolina Belle Furnishings, including this cream one that has been glazed with an antiquing grey shade! I have seen people use them as headboards, or use them traditionally to add character to a living room, dining room, bedroom, or screened in porch!
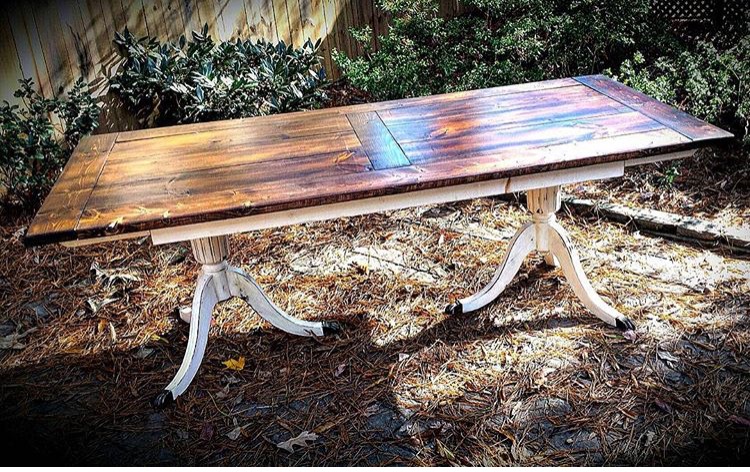 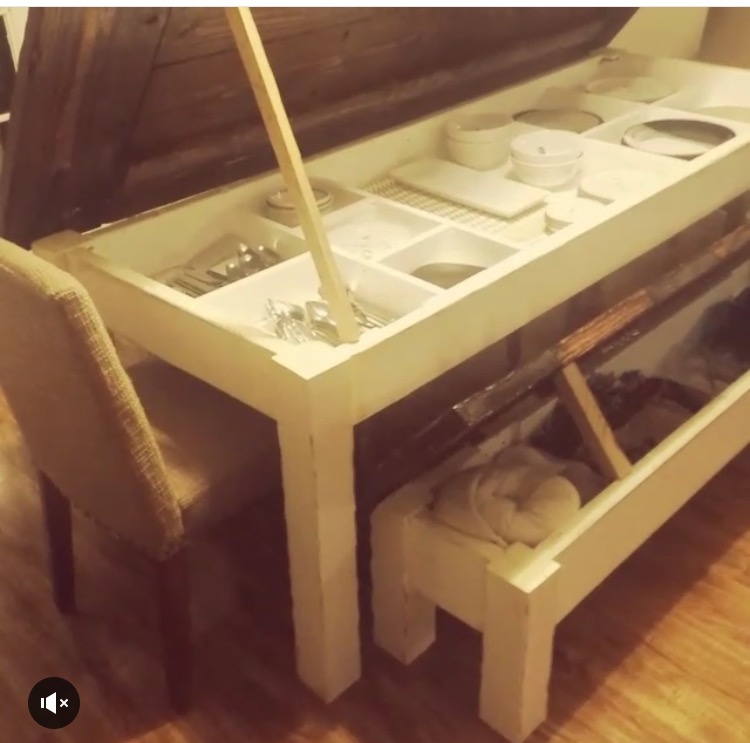 Did you guys even know this was an option? Storage INSIDE your farmhouse table and bench? Say whaaaaaa? I had not even seen that on Pinterest!
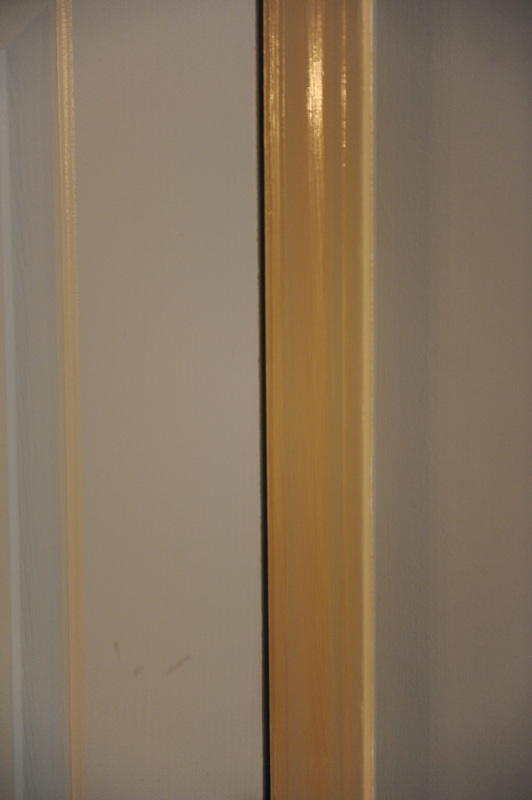
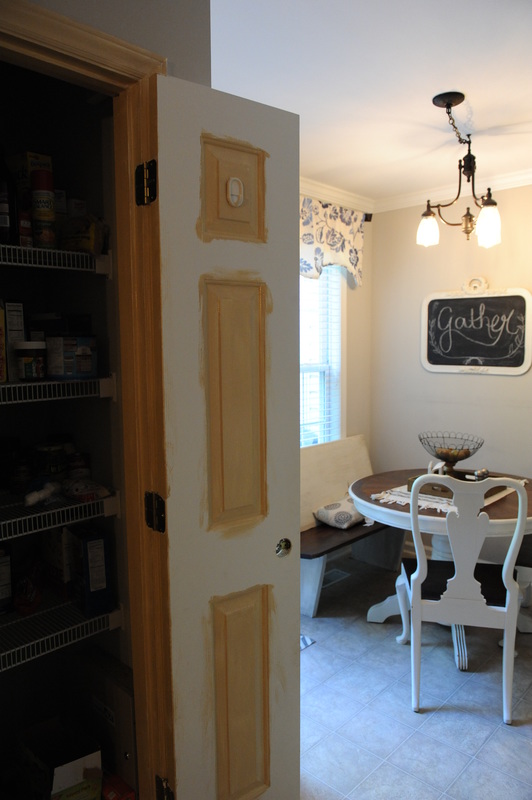
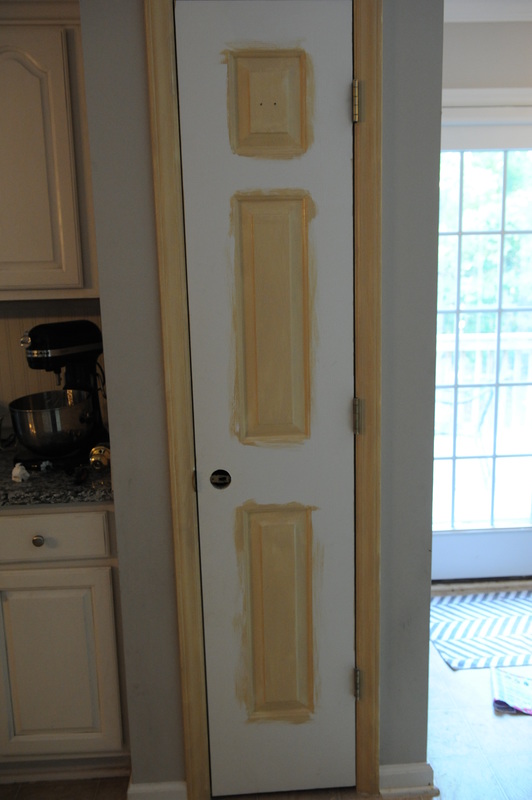
I have been searching and saving for a farmhouse table for quite a while, and was going to buy this beauty here with the duel pedestal legs- drool worthy, #amiright, but someone had already placed dibs on it. That's when I noticed the other tables that had been built WITH the storage feature! I knew I had to tell you guys about it!!! Joe builds these tables to order in Raleigh, NC! You pick your size, stain, style of legs, etc! Joe is working on some benches for us now, as well as some floating shelves! Eventually, our shelves will be complete with a library ladder too, but I have to practice the "slow and steady wins the race" method! Pacing myself with projects has never been a strong suite of mine, but it will be worth the wait! I'll share pictures and an updated post as the pieces are built, but, in the meantime, You can find Joe at Ten_Eight_Custom_Finishings on Instagram! 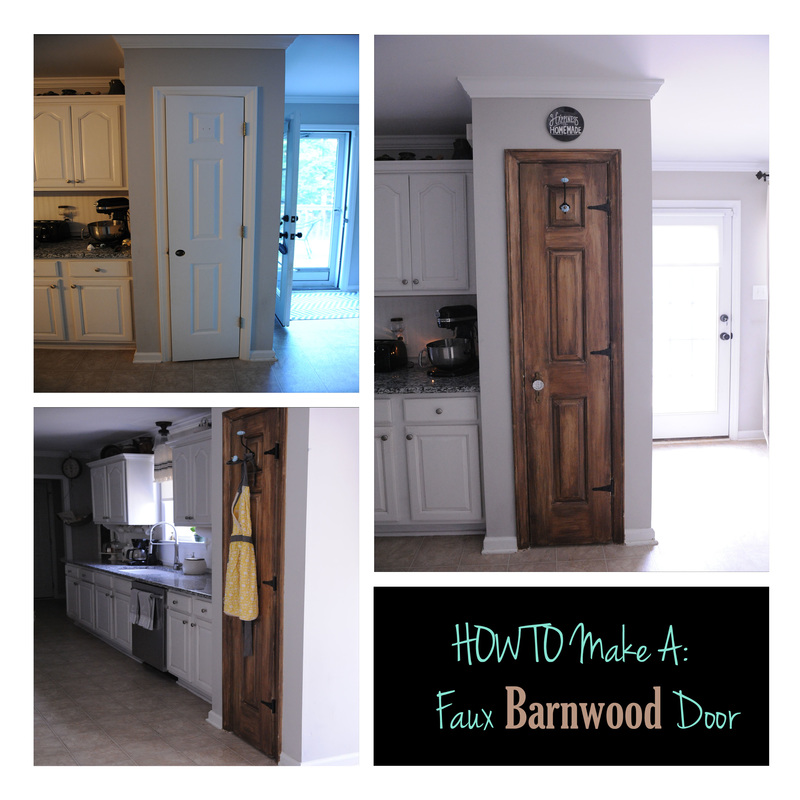 (Raise your hand if you're obsessed with pretty much all things barn wood, rustic, industrial, and farmhouse! Okay, so all of us?! ha :) I have always loved this style, and am quite content with how easy it has become to find decor items lately. I know this style wont always be "the most popular thing", but it is a timeless, classic style! Any of us who knows with every fiber of our being (me, me, me) that this will always been our style, can rack up on decor items while they're so easily available. Do you know what I couldn't rack up on? Barn doors, darn it!!! I don't have a door in my house that will work for a sliding barn door! Not one! Thank goodness God make me creative because at least I can faux that look!!! I thought I'd share how I transitioned our pantry door from a boring white door to a lovely, warm "wood" door!! If you like it, give a shot! I'd love to see your before and after in the comment section below! Okay!!! Here we go! We started with this builder grade, plain white door-(This is after I took the standard, round door knob off) 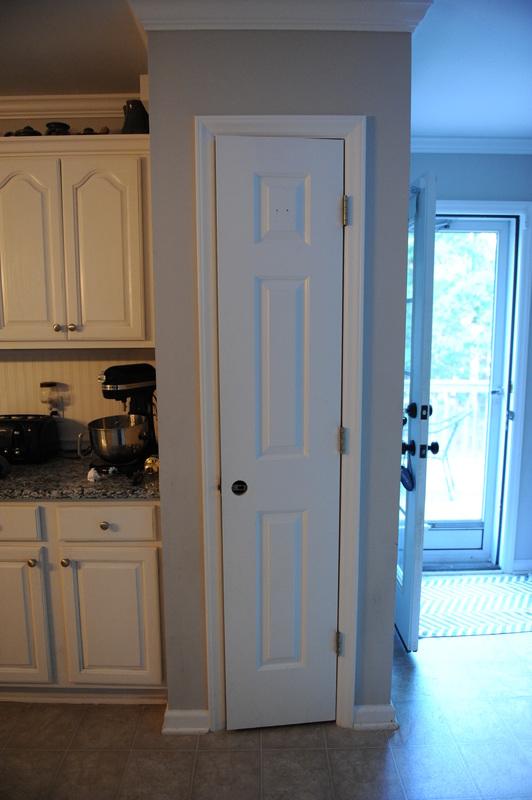 I first mixed up my own chalk paint into a beige color. Because I wanted a very walnut shade door, I went with beige, but depending on the shade you want your "barn door" to be, you'll want to make the chalk paint shade lighter, darker, or more gray. Chalk paint is crucial here though! This is a factory grade door with that slick, almost "plasticy" feel. You need chalk paint because it will not only grip to your door's surface, but also give something for your stain, glaze, and wax to stick to! Step 1- Remove your knob. I did not remove this door from the hinges to do this, but should have changed the hinges BEFORE I started the door! Step 2- Paint the door frame!
Don't forget to paint the frame on the inside as well! 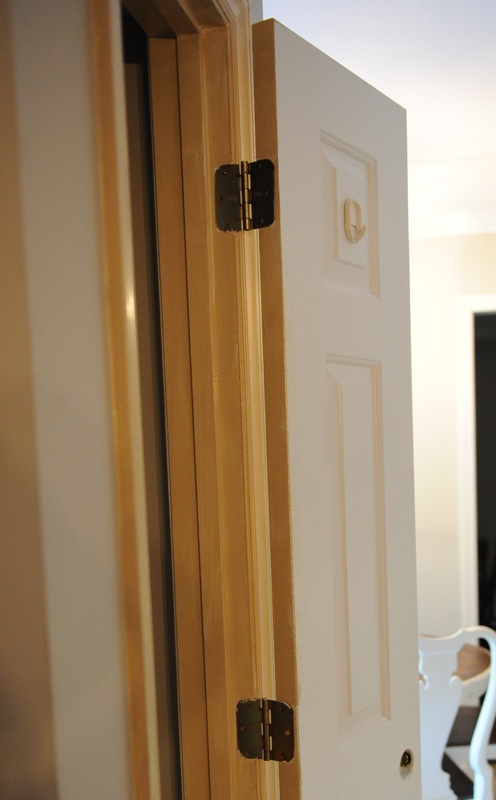 Step 3- Paint any hollow areas of the door first!
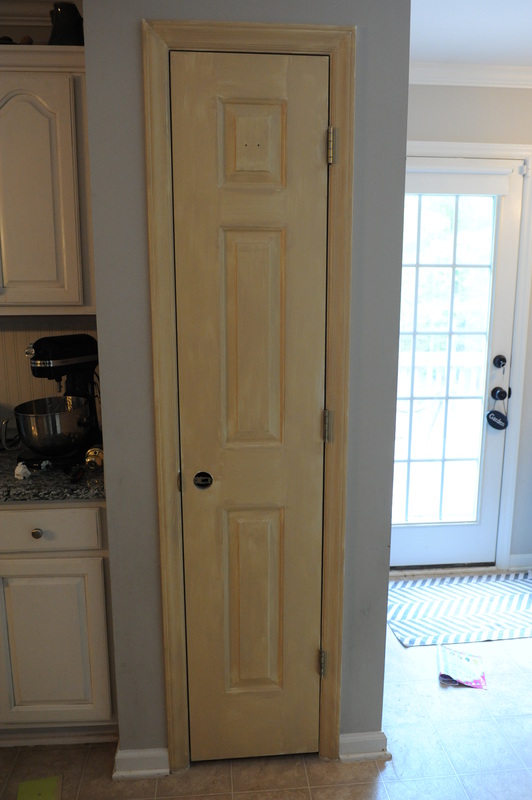
And, Voila!!! Beautiful barn door, right?!!! No? It looks awful? It sure does! I have noticed EVERY project looks awful at the beginning, but don't ever get discouraged by the first several steps! Keep your eye on your vision, and, with each step, you'll notice you're getting closer and closer to matching that picture in your head! Okay! Let's keep going! Step 4- Fill in the rest of your door! (The lighting makes ours look like they're different colors in the pictures below, but they match! I promise! The amber undertones in our edison bulbs are making the inside of the door look darker! Silly color cast science can't you help a sister out for a minute? I went with what the grain would be on a barn door. I went vertically for all the edges and rectangles, and went horizontally for between the rectangles!
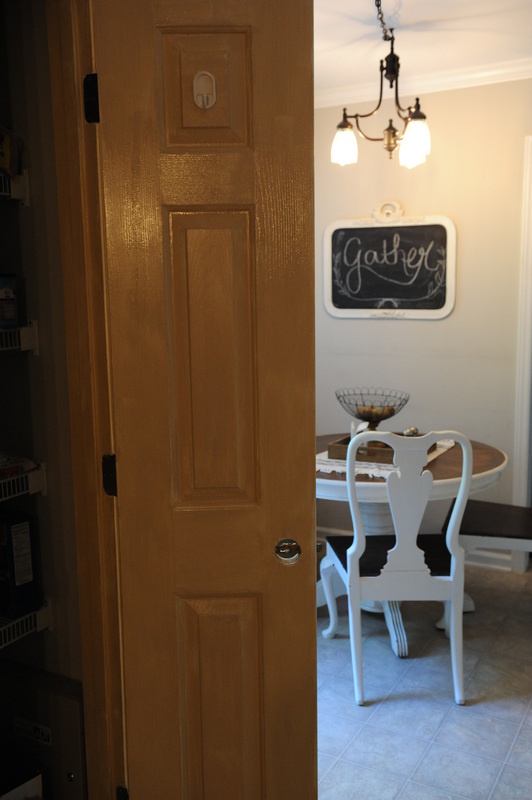
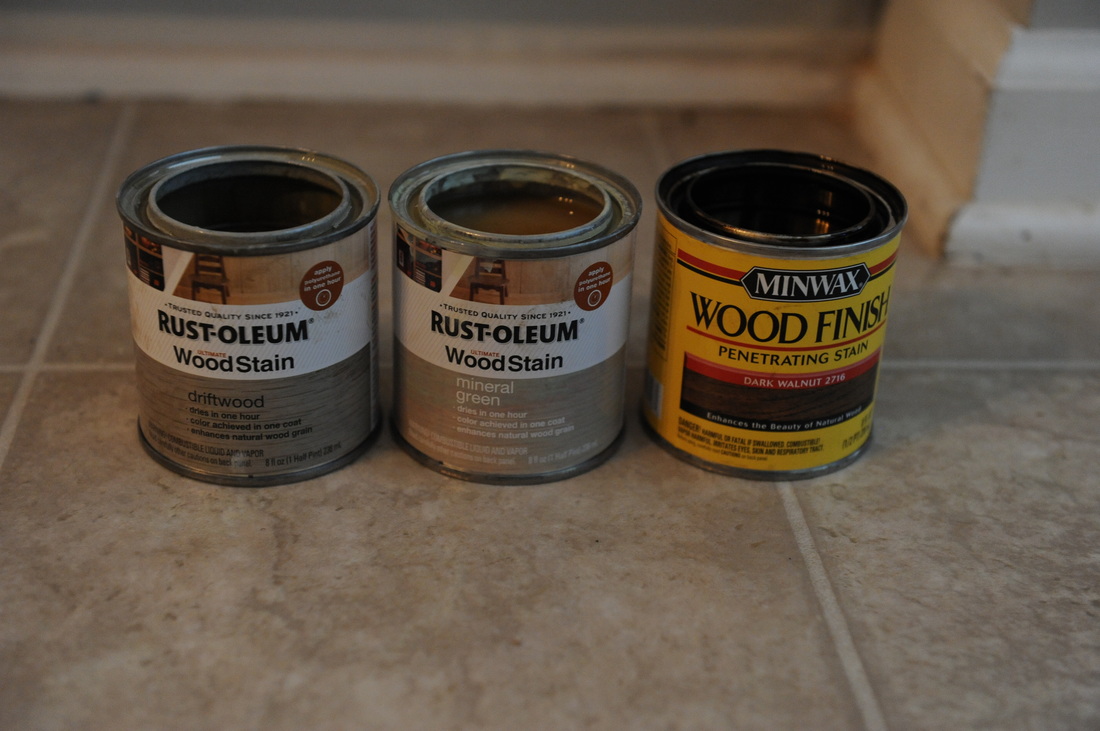 Okay, let this dry! Get your stain shades ready! I knew I wanted to try blending these colors, but ended up only using the dark walnut, and teensy bit of driftwood in the center areas of the three rectangles. Step 5- Using your stain, repeat the steps in the same order you used for the paint: door frame, deep areas, total door. I also went with what the grain would be on a barn door again. I went vertically for all the edges and rectangles, and went horizontally for between the rectangles! I make sure to have heavier coverage in the deep areas and the outer rims of the door. I let the color feather in and soften as I come in toward the rectangles. I also let the color soften as it comes into the center areas of the rectangles. This just helps add dimension and visual interest to your finish and makes it look more realistic. If you look at the pictures you'll notice that the outer rims and deep areas are darker, and the raised area and center areas are softer (lighter)! 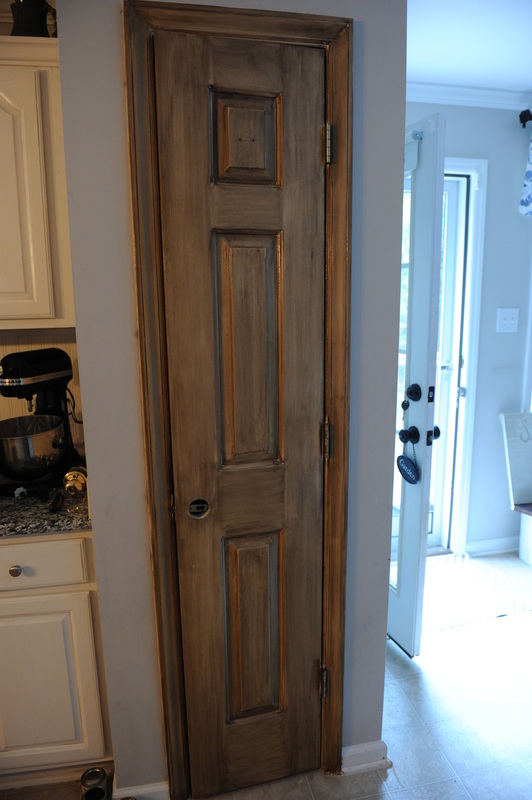 I didn't have painter's tape on hand, but I did have our wall color paint, so I just didn't mind if a tad went onto the wall. I knew I could clean it up, and get a more fresh line than was originally there from the painters before we moved in. Okay, moving on! Step 6- This step is totally optional. I used a Valspar glaze. It's a deeeeeep gray/almost black glaze inside the edges of all those rectangles front and back. I applied it with a sponge brush, and wiped it off with a cheesecloth (your cheesecloth should have a splash of water, a mist of water, just the teensiest bit of water on it. I wash my hands, shake off as much as I can, and dry them with the cheesecloth to get it right)! Just rub it in with the sponge brush, and rub it out with the cheesecloth! This adds shadow to your door, and helps "age it" a lot! Step 7- I used Martha Stewerts Antiquing Wax to seal the entire door. You should wait about 48 hours to use this on top of the stain though. Learn from my mistakes! I didn't wait, and it took about TWO WEEKS to dry!! Anywhoooo, you'll want to seal the door with this antiquing wax in the same manner as with the paint and stain: door frame, depths of door face, and then the whole door. You'll also want to keep heavier coatings on the edges of the door and deep areas to give it a natural look. Just feather in in the same way as the stain. I also went with what the grain would be on a barn door. I went vertically for all the edges and rectangles, and went horizontally for between the rectangles! This step seals your piece AND gives you that final touch for an aged barn wood door look! We changed the hinges and door knob as well, and bingo bango........ya got yourself a barn "wood" door!!! I really love the warmth it has brought to the kitchen!! If you love it to, go for it!!! I know you can do it! If you just don't have the time, bring it to me! I got you! :) 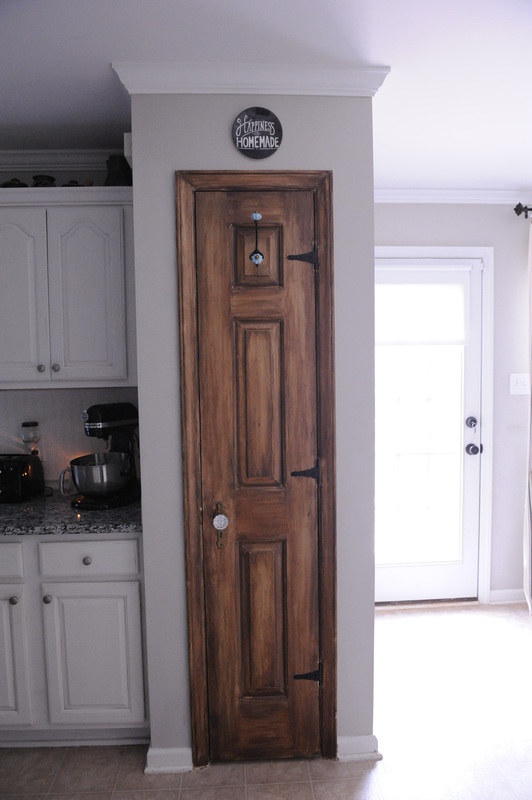 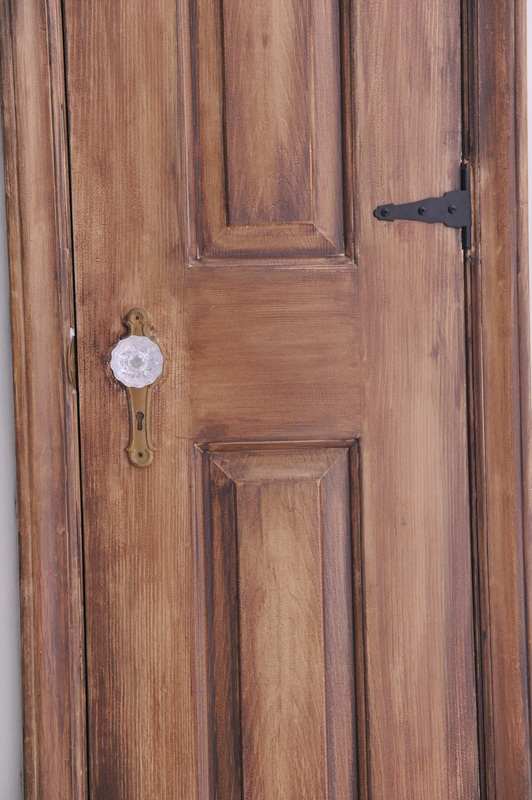 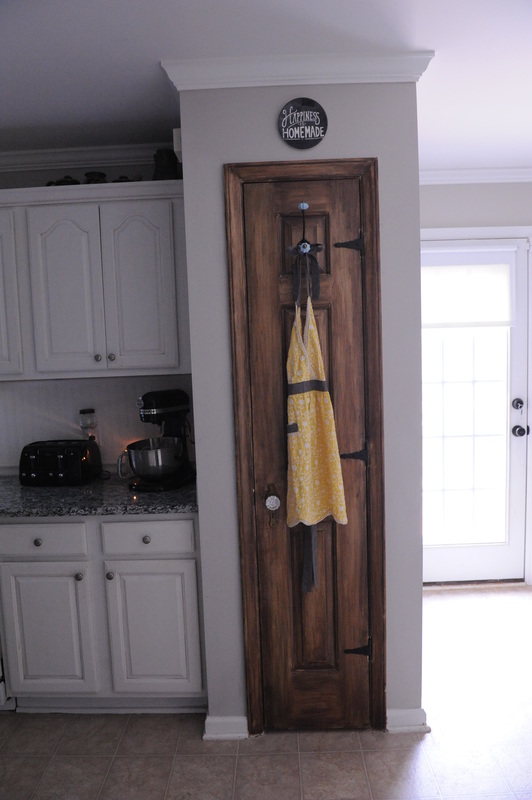 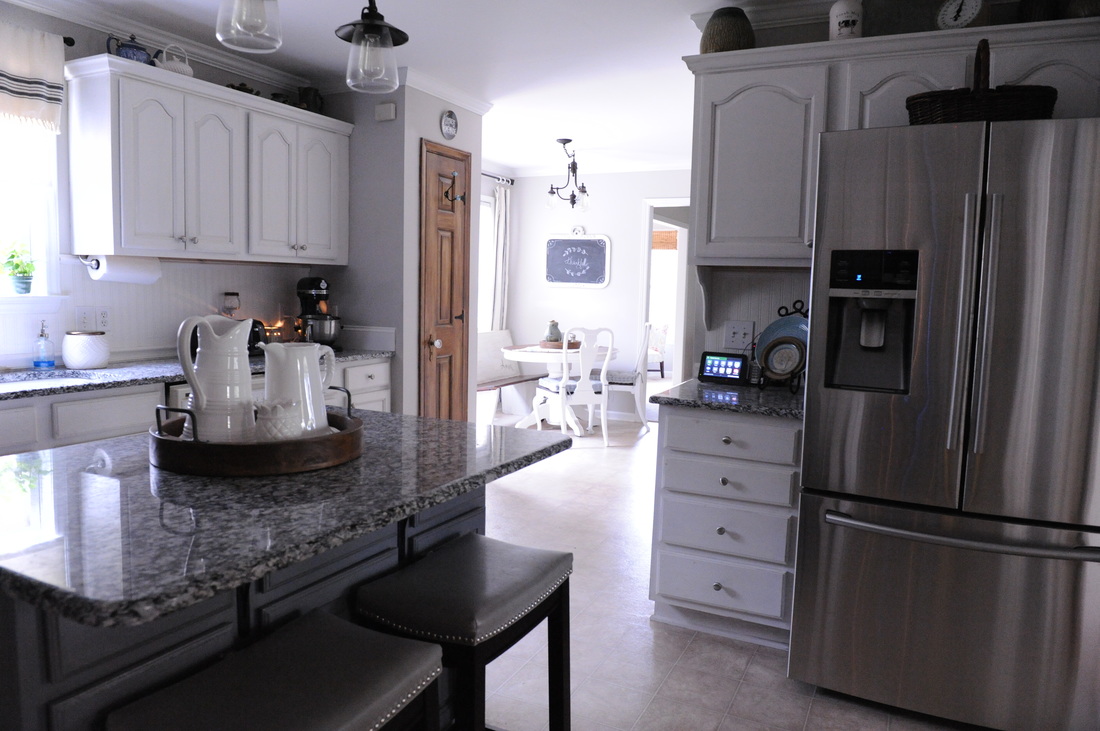  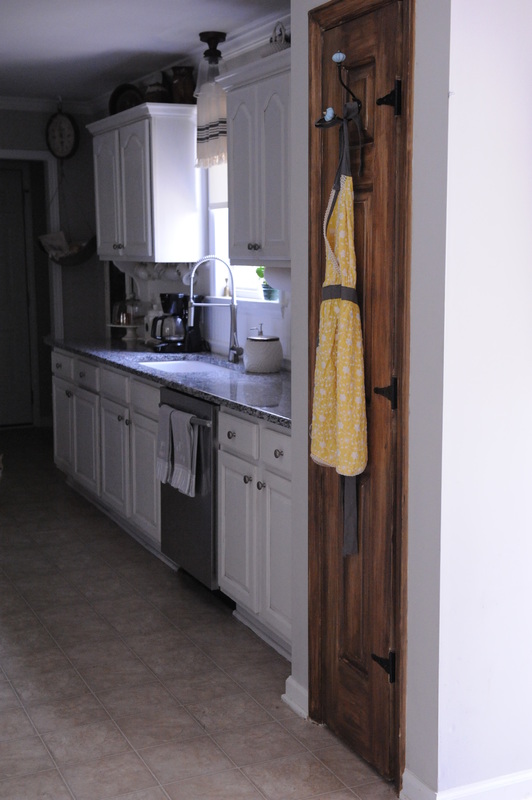 How I Updated My Kitchen, Dining Room, and Breakfast Nook Curtains and Place Settings for Under $5010/22/2015 
 Before & After
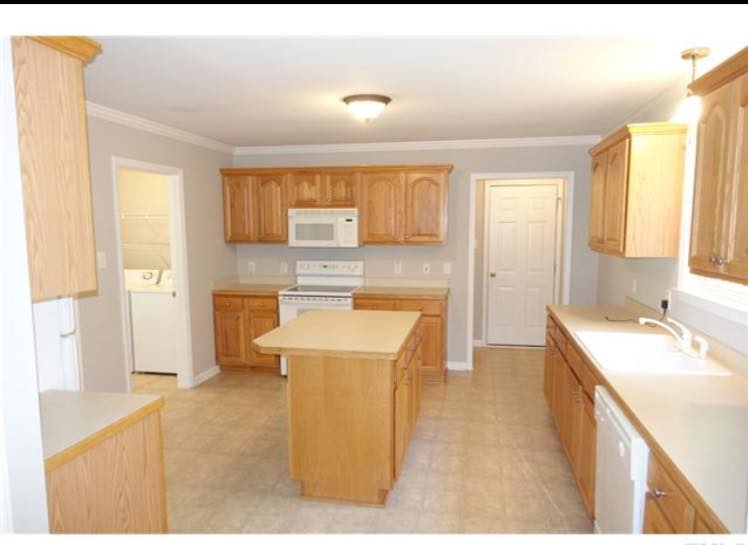
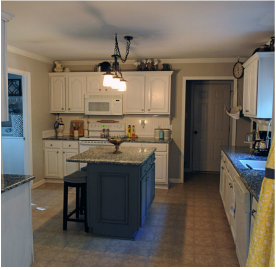
Aaaaaah, white kitchens! Is there anything that can stop our Pinterest browsing faster than a picture of a white kitchen? A white kitchen with some farmhouse accents and decor~Sign me up! It's my personal match made in heaven! My husband and I found this house, and when I saw that kitchen.....yep....that before pic one right up there, I begged and pleaded with our awesome Realtor to MAKE THIS HAPPEN! We had that pesky problem (aka reality) to deal with where we had to sell our house before we could buy this one, but we knew, God willing, this was the one! I'm happy to say, we've just crossed the one year mark of being in this home, and are having an absolute blast making all the rooms match the "after picture" I had in mind during that first walk through! My husband is a very visual person, but "visual" meaning in the here and now! He can only see exactly what he's looking at! If I describe how something is going to look he has zero, nada, zilch concept of what I am actually talking about until it is finished and he can lay his pretty baby blues on it! Our kitchen still needs updated appliances & new floors, SO TRY to picture these pictures with black or stainless appliances, and those drool worthy 6 inch wide, and extra long, hickory or walnut looking hardwood (laminate because we have kids and dogs who could care less about scratching real wood, so~yes! I'll pinch those pennies~please & thank you) :) Picture it with wood and not our ripped linoleum?? Deal??? .......Deal! :) Okay, pictures: Lastly, the details & nitty gritty on the changes we made are down below the pictures! Changes we made:
We tried to think of some easy things that we could do that would really add some character to the room. ~For the cabinets we: painted them, glazed them, created contrast with the island and counter top colors. *We used (and loved) the Rustoleum Cabinet Transformation Kit. It's holding up wonderfully, easy to clean, and the only area we're having any chipping struggles is the top of the cabinet that holds our sliding trash can. That is completely our fault. For some reason, no one ever remembers there's actually a KNOB on that door! :) (I too am guilty.....I don't know what it is with that one cabinet)! If you're in the NC area (specifically close to the Raleigh and surrounding areas), and do not want to take this task on yourself, I HIGHLY recommend _Lexie and the Chi Ashley, and her husband do a SUPERB job, and their quality of work is immeasurable! ~We added shelf brackets to the ends of the upper cabinets, and a rectangular molding to the sides of the island. These steps really helped the cabinets have a custom feel to them, and were not expensive at all! ~We bought finial feet to put on the bottom the cabinet ends, but can not put those in until the floors are done. Again, this will add a very custom feel as well. We bought fatter ones to frame the bottom of the island, and thinner ones to frame the end sections of the base cabinets. ~We changed our light fixtures and faucets, which really helps with the farmhouse goal. I can't stress this step enough! If you can't afford new ones, paint your existing ones to mimic the style you most like! ~Lastly, and probably most importantly, we added rustic, vintage decor items that have a very raw, organic feel to them. I LOVE LOVE LOVE the hanging scale from Dot & Bo, and the linen board that holds our mother's & grandmother's handwritten recipes. Aside from the obvious stores (flea markets, antique stores, several online stores, Home Goods, Kirklands, etc), the BEST place to find these items is in your grandma's attic, garage, or basement! With that route, you have vintage and SENTIMENTAL! :) If you're transitioning your room to one with a more farmhouse feel, comment below with what helped make the biggest impact in your room, and your favorite honey hole place to shop! I'd love to see your before and after pictures! This was the quickest, easiest update we have done to our new house so far. My husband changed our faucet from the "knob faucet" to this new, brushed nickle one. I wanted one like this because it was so difficult for our little girl to adjust the water temperature with the knob. With this updated faucet, she can wash her hands without yelling, "MOMMMMMMMY, the water's hot", which makes her happier, and, hey, it's prettier too! win win! For the cabinets, I used a deglosser, then primed them, then painted two coats of colonial blue, applied a dark gray glaze into the detailed areas, and sealed with a good poly. I hated those counter tops before the paint, but, against the blue, I LOVE them! I think it offers a nice contrast! We're likely to add a frame to the mirror "one day", and still have to change our flooring from the linoleum, but "slow and steady" is the name of our game! I'm really happy with this simple before and after! What have you done to personalize your powder rooms? Master Bath Before and After
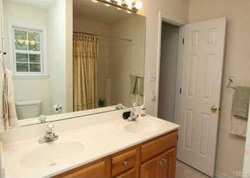
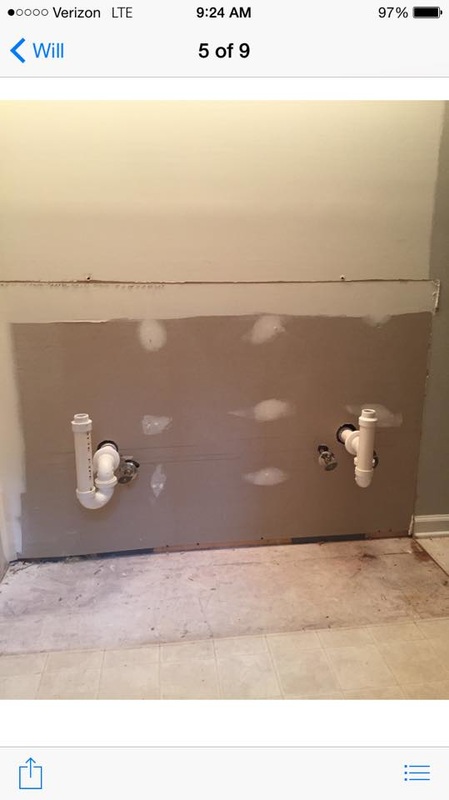
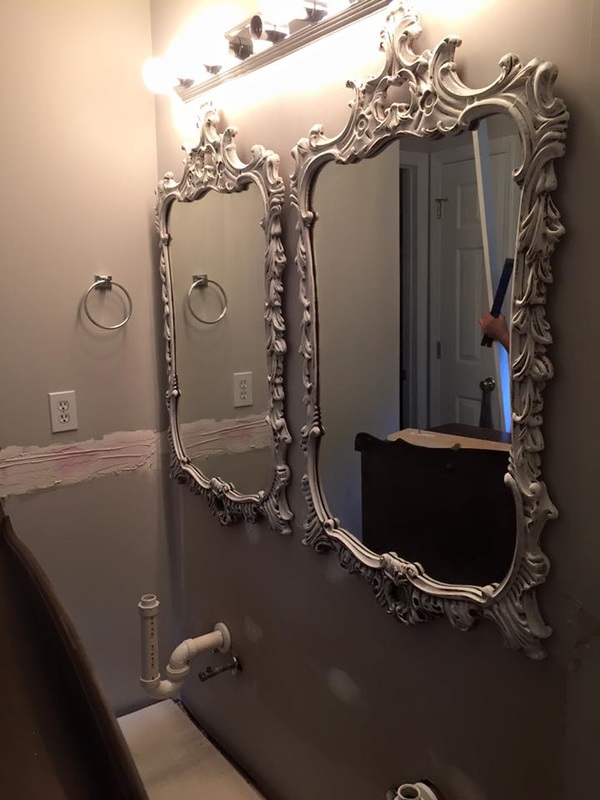
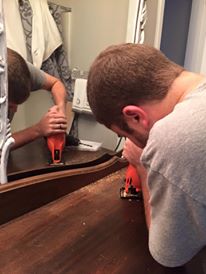
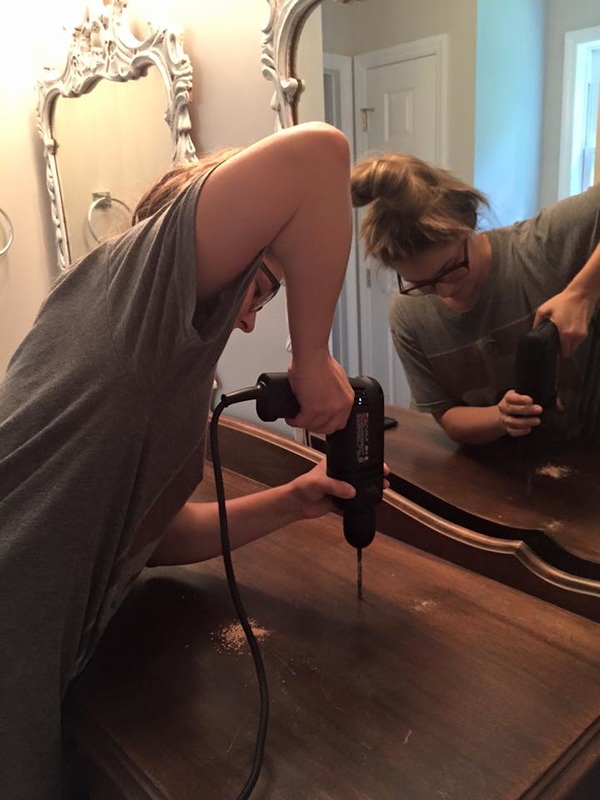
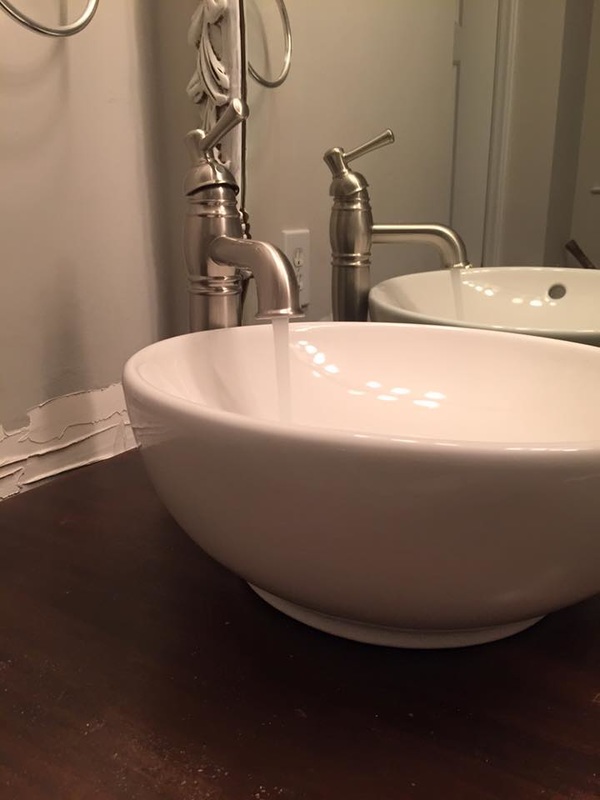
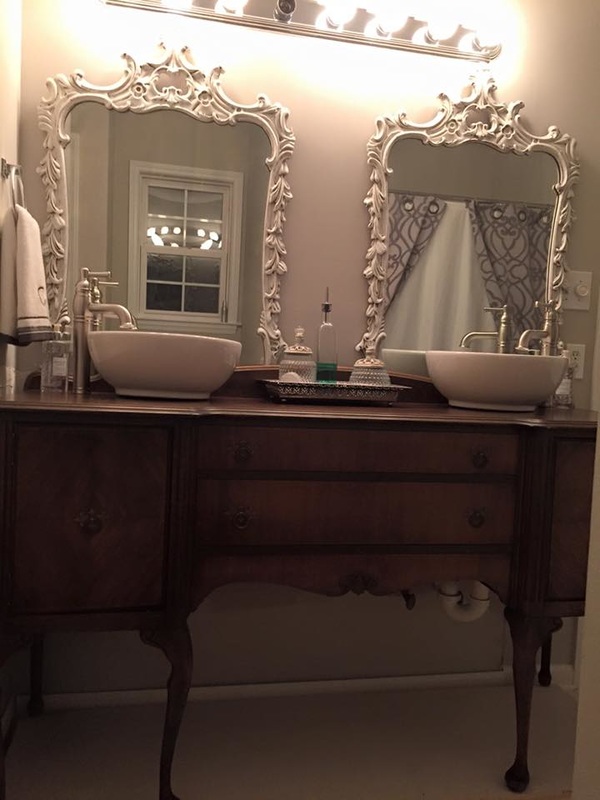
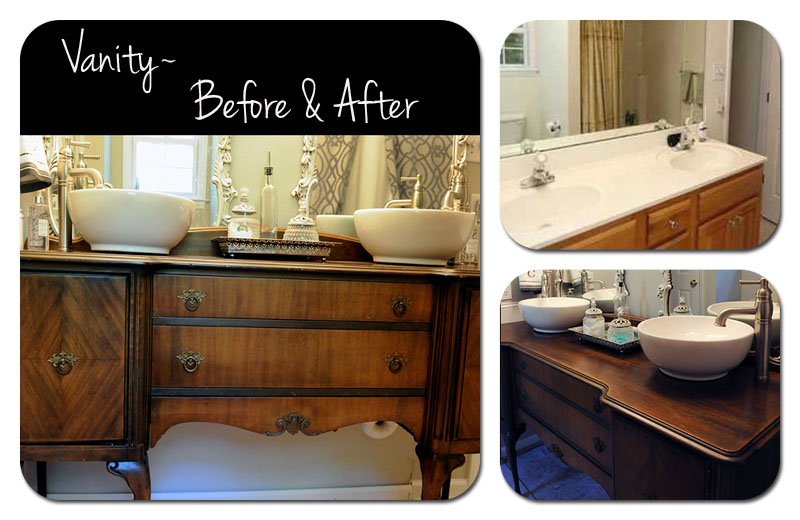
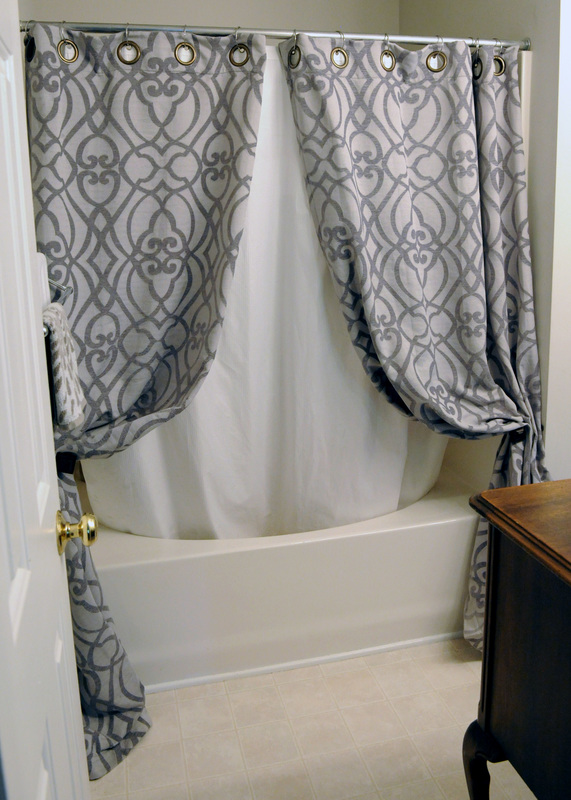
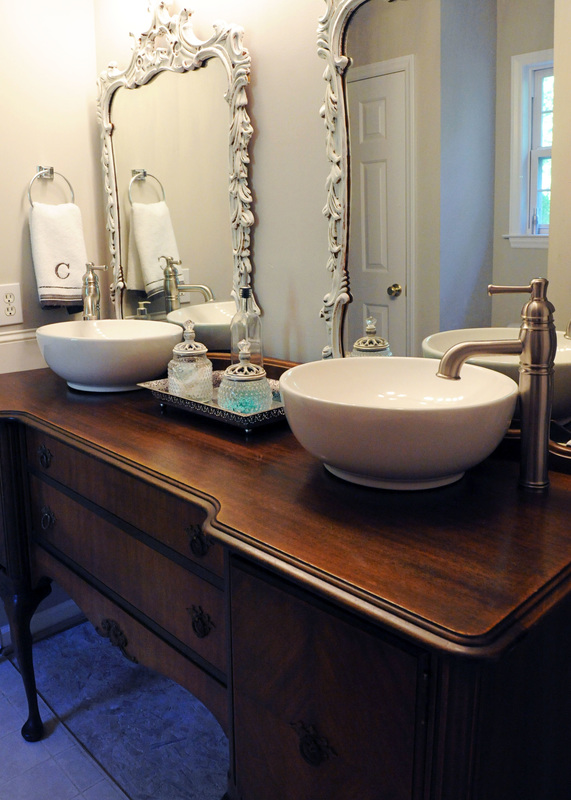
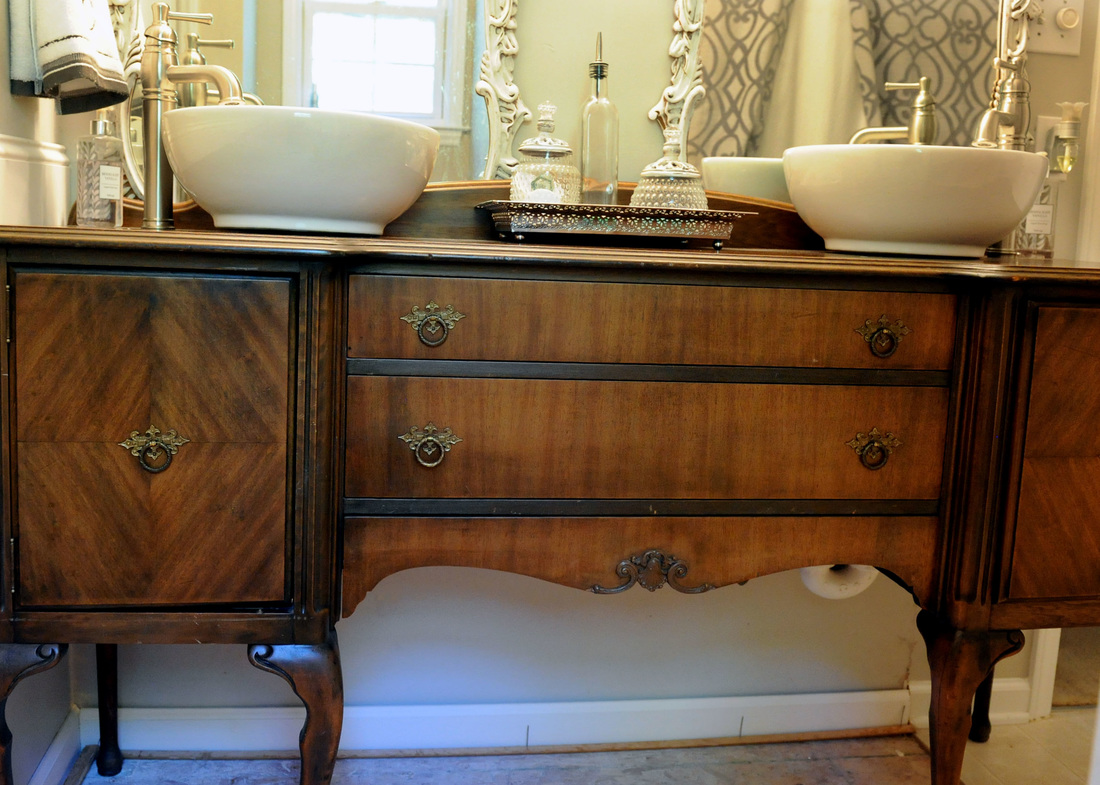
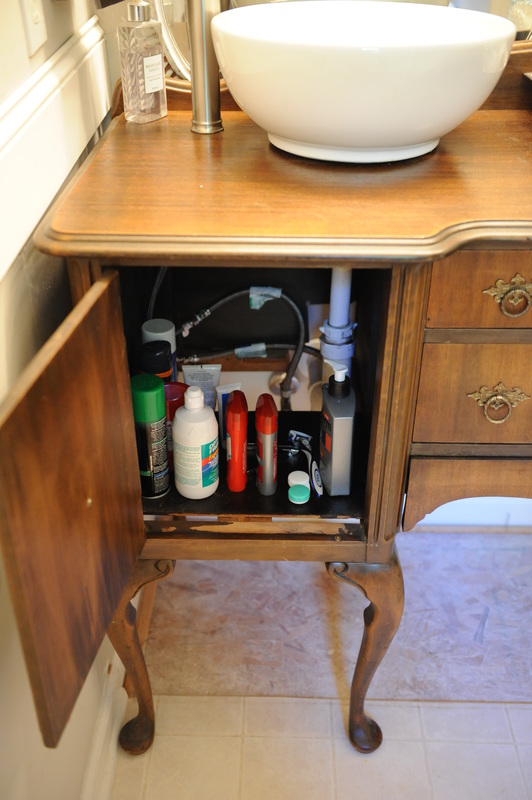
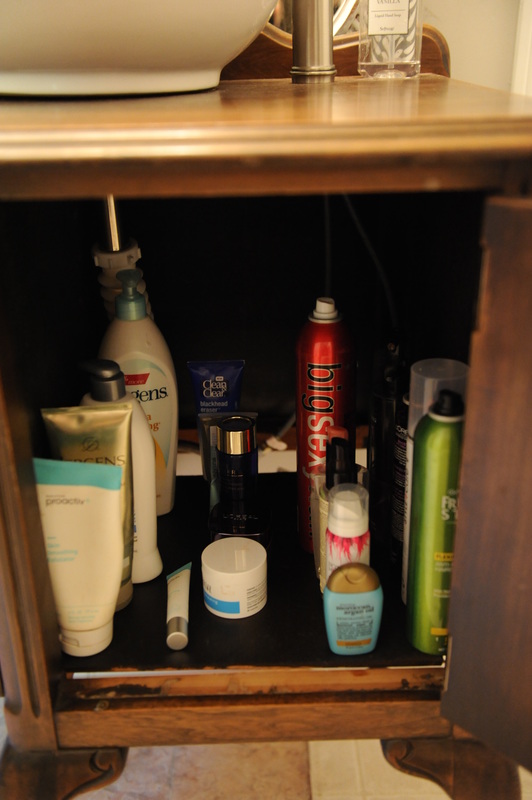
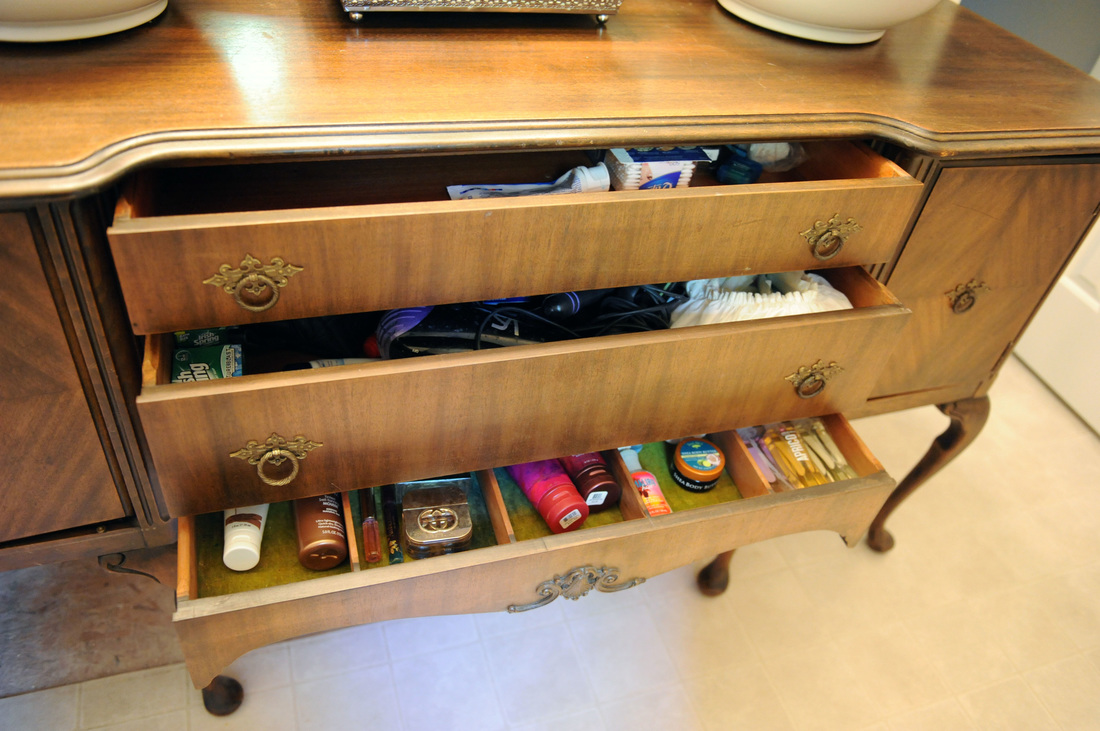
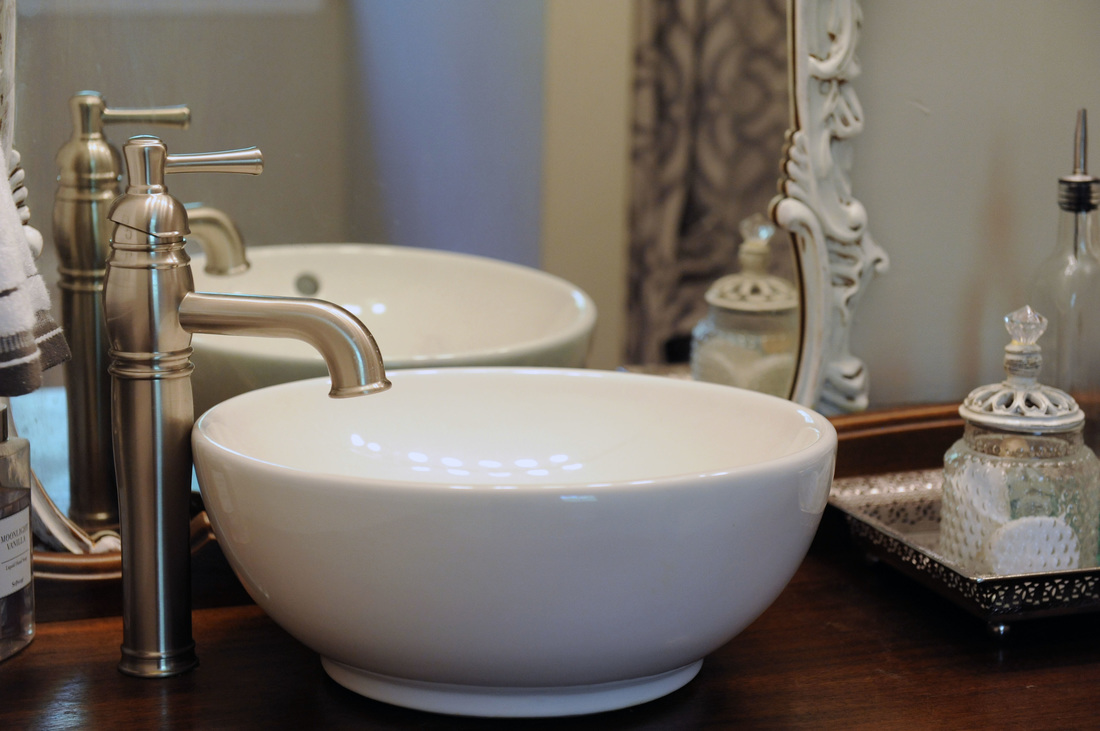
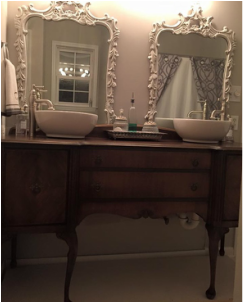 (Pictures posted at the bottom) Our master bath was a pretty standard master bath. It's a great bathroom, but it just didn't feel....."pinteresty"! It needed something to give it some character. It needed a focal point. Since our budget didn't allow for a total shower overhaul, we overhauled the dual vanity instead. We (meaning I) went into this all gung ho, and full speed! I was doe eyed, and my usual optimist self. I expected this to be smooth sailing, and easy breezy. I will admit to you, it was not! It took several unexpected trips back to the hardware store, and even though it is now "finished" we have visible sub floor now. New flooring is next on our new home renovation list, so I am trying to turn a blind eye toward it. Flooring will be sometime within the year, but, if I come across a cheap carpet runner before then, I'm going to snatch that thing up like it is Walmart's last Black Friday flat screen. :) How we did it: ~First, we removed the mirror, all the caulk, the molding around the base of the existing vanity, and hauled it to the garage (side note: my husband bought a chunk of wood to fit on top, and is now using it as work bench with storage space in the garage)! ~Then we hung the two mirrors that my grandma (mema) and I found at an auction. They were a carmel shade of brown, but I white washed them. ~We carried the "dining room buffet" (also found at auction) into the bathroom, and lined up our measurements for the new pedestal sinks and faucets (we measured, then remeasured, then had the other person come behind and check our measurements because, let's be real, we had never done something like this before)! ~We used a drill to get a starter hole, and then cut our circles for the drain and faucet with a jig saw. ~ tapped the finishing nails out so we could temporarily remove the cabinet bottoms, lifted the piece over the pluming coming out from the wall, and lined the piece up. ~ My husband hooked up all the pluming, which required at least three more trips to the hardware store. This would have been a breeze if we'd been well versed in the world of plumbing! ~We fit the sinks and faucets in place, tightened everything down, and very nervously turned the faucet on! SUCCESS!!! We had running water! ~Next, my husband cut the cabinet bottoms in half to both allow room for the plumbing, and continue to give us storage space. ~I went BACK to the hardware store, got a waterproofing seal, and sealed the top. I wanted to keep that wood, but ensure it would stay nice! I will probably have to reapply it in a few years, but it's worth the little bit of extra effort. Overall Thoughts~ I think this came out wonderfully, but, in ALL HONESTY, I could have just changed the mirror to the two mirrors, painted the existing vanity, and updated the faucets to get a updated feel in there! It would have given the room an overhauled look, but I'm so glad we did we did it the way we did! We learned a lot along the way, and it really does make me smile every time I walk by it. I'll post an updated picture when the flooring is finished as well! |
AuthorI'm a wife, a mother of two, and utterly obsessed with home decorating and renovations (including, but not limited to: painting, decorating, interior design, and furniture renovation). Archives
September 2016
Categories |


 RSS Feed
